Proline CR75P Operativní instrukce
- Kategorie
- Rádia
- Typ
- Operativní instrukce

Downloaded from www.vandenborre.be
OPERATING INSTRUCTIONS
MANUEL D’UTILISATION
HANDLEIDING
ISTRUZIONI OPERATIVE
POKYNY K OBSLUZE
NÀVOD K OBSLUZE
INSTRUCCIONES DE FUNCIONAMIENTO
INSTRUÇÕES DE FUNCIONAMENTO
PROline
CR75P
PROJECTION ALARM CLOCK RADIO
RADIO-REVEIL AVEC PROJECTION DE L’HEURE
PROJECTIE WEKKERRADIO
RADIO SVEGLIA CON PROIEZIONE D’ORA
PROMÍTACÍ BUDÍK S RÁDIEM
RÁDIOBUDÍK S PROJEKCIOU
RADIO RELOJ ALARMA DE PROYECCIÓN
RÁDIO, RELÓGIO, ALARME E PROJECÇÃO

Downloaded from www.vandenborre.be
ENGLISH
1
ELECTRICAL CONNECTION (UK ONLY)
For your safety please read the following information
This appliance must be connected to a 230-240 volts 50 cycle AC supply by means of a three
pin socket, and should be protected by a 3 amp fuse. Any other supply may cause permanent
damage, injury or an electrical hazard.
The appliance is supplied with a standard 13 amp 3 pin plug fitted with a 3 amp fuse. Should
the fuse require replacement, it must be replaced with a fuse rated at 3 amp and approved to
BS1362.
If the mains plug is unsuitable for the socket outlet in your home or is removed for any other
reason, then the cut off plug should be disposed of safely to prevent the hazard of electric
shock.
There is a danger of electric shock if the cut off plug is inserted into any 13 amp socket outlet.
How to wire a 13 amp plug.
Important
The wires in the mains lead on this appliance are coloured in accordance with the following
code:
Blue – Neutral
Brown – Live
As the colours may not correspond with the markings identifying the terminals in your plug
proceed as follows.
The blue wire must be connected to the terminal marked N or coloured black.
The brown wire must be connected to the terminal marked L or coloured red.
No wire must be connected to the terminal in the plug which is marked with the letter E or with
the earth symbol or
coloured green and yellow.

Downloaded from www.vandenborre.be
ENGLISH
2
IMPORTANT SAFETY INFORMATION
1. Object and liquid entry - Care should be taken so that objects do not fall and liquids are not
spilled into the enclosure through openings.
2. Water and moisture - The appliance should not be used near water; for example, near a
bathtub, washbowl, kitchen sink, laundry tub, in a wet basement, or near a swimming pool,
and the like.
3. The ventilation should not be impeded by covering the ventilation openings with items,
such as newspapers, table-cloths, curtains, etc.
4. No naked flame sources, such as lighted candles, should be placed on the apparatus.
5. It shall not be exposed to dripping or splashing and that no objects filled with liquids, such
as vases, shall be placed on the apparatus.
6. Do not place the product in closed bookcases or racks without proper ventilation.
7. Where the mains plug or an appliance coupler is used as the disconnect device, the
disconnect device shall remain readily operable.
y Precautions: Please ensure that you read and follow the handling and safety
precautions of this guide before attempting to use the projector clock.
y Place this Magic Clock out of the reach of children and infants.
y Do not attempt to disassemble or alter any part of the equipment that is not
expressly described in this guide. Disassembly or alteration may result in
high-voltage electrical shock. Internal inspections, alterations and repairs should
be conducted by qualified service personnel only.
y Never touch internal portions of the equipment which become exposed as a result
of damage. There is a risk of high-voltage electrical shock. Return it to the retail
store from where you purchased it.
y Do not allow the equipment to come into contact with, or become immersed in water
or other liquids.
y Do not use substances containing alcohol, benzene, thinners or other flammable
substances to clean or maintain the equipment.
y Do not handle the power cord if your hands are wet.
y Use of power sources, or batteries not expressly recommended for this equipment
may lead to overheating, malfunction of the equipment, fire, electrical shock or
other hazards. Use only the recommended power source.
y Do not place a naked flame source near or on this product.
y Do not attempt to disassemble, alter or apply heat to the batteries.
y Avoid using, placing or storing the equipment in places subject to strong sunlight or
high temperatures. Exposure to intense sunlight and heat may cause the batteries

Downloaded from www.vandenborre.be
ENGLISH
3
to leak, overheat or explode, resulting in fire, burns or other injuries. High
temperatures may also cause deformation of the casing.
y Do not store the equipment in humid or dusty area.
y Never place the projector clock close to electric motors or other equipment
generating strong electromagnetic fields. Exposure to strong magnetic fields may
cause malfunctions or corrupt image.
y Do not place projector clock on places sensitive to vibrations or table edges.
y Do not look directly into the projector lens as doing this may permanently damage
your sight.
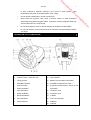
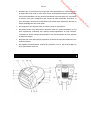
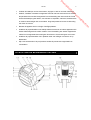
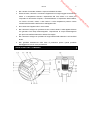
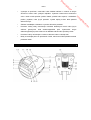
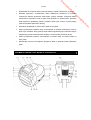
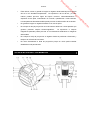
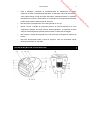
LOCATION OF CONTROLS
1. LED Digital Clock Display
2. Volume Control – Buzz On / Off
3. Tuning Control
4. Waveband Selector
5. Snooze Control
6. Alarm Set Button
7. Time Set Button
8. Sleep Set Button
9. Minute Set Button
10. Hour Set Button
11. Power Selector
12. FM Antenna (located on back)
13. Auto Indicator
14. Battery Door (located on the base )
15. POWER Cord (located on back )
16. Projection On/Off Selector switch (on left
hand side )
17. Projection Case
18. Projection Lens
19. T Button
20. Focus Thumbwheel
21. M Button
22. H Button

Downloaded from www.vandenborre.be
ENGLISH
4
SETTING THE MAIN CLOCK
NOTE: There are two separate clocks in this product.
1. Set the Power Selector (11) to”OFF”. Connect the mains lead to the power supply. The
base clock display will flash on and off indicating a power interruption and that the
displayed time is incorrect. Please note, the projection clock does not flash after a
power interruption!
2. To set the correct time, press and hold the Time Set Button (7) then press the Hour Set
Button (10), or Minute Set Button (9), together, until the correct time is displayed. (Release
all buttons)
3. Open the clock Battery Door (14) on the under side of the unit and insert a 6LR61 (or
equivalent) 9-volt battery. The purpose of this battery is to store the information relating to
alarm time and to keep the clock functioning in the event of disconnection from the mains
supply or power interruption. Should this occur, the clock would continue to keep time, but
the display will not illuminate.
PLEASE NOTE: When operating from battery, the clock will only remain accurate for a short
period of time. It is important that the mains supply is restored as soon as possible.
ALARM TIME SETTING
1. Press and hold the Alarm Set Button (6) and repeatedly press the Hour Set Button (10)
then the Minute Set Button (9) as appropriate until the required alarm time is displayed.
(release all buttons)
2. To double check the alarm time, simply press the Alarm Set Button (6) then the display will
show the pre-set alarm time.
RADIO OPERATION
For AM reception this unit uses an internal directional aerial, rotate the unit for best reception.
For FM reception, the wire FM Antenna (12) on the back of the unit should be fully unwound.
1. Set the Power Selector (11) to the “ON” position.
2. Set the Waveband Selector (4) to the required waveband. (AM or FM )
3. Use the Tuning Control (3) to select the desired station.
4. Adjust the Volume Control (2) to the desired listening level.
5. To turn off the radio, set the Power Selector (11) to”OFF”. If the radio does not switch off
this may be caused by inadvertent operation of the Sleep Set Button (8). To cancel this,
press the Snooze Button (5) once.
WAKE TO RADIO
Having selected your desired station and adjusted the desired listening level proceed as
follows: -
1. Follow the instructions for “ALARM TIME SETTING” above.
2. When the desired alarm time has been set, set the Power Selector (11) on the “AUTO”
position.

Downloaded from www.vandenborre.be
ENGLISH
5
3. The radio will switch on automatically at the pre-set alarm time.
4. The alarm can be temporarily stopped for 9 minutes by pressing the Snooze Button (5)
once. This can be repeated up to 5 times.
5. The alarm will switch off automatically after 1 hour 59 minutes or can be cancelled by
switching the Function Selector (11) to the “OFF” position.
6. The alarm will activate again after 24 hours unless the Function Selector (11) is set to
“OFF”.
WAKE TO ALARM
1. Follow the instructions for “ALARM TIME SETTING” above.
2. When the desired alarm time has been selected, set the Function Selector (11) to the
“AUTO position.
3. Turn the Volume Control set (2) fully clockwise to select the BUZZ function. (When you
hear a “CLICK“ the function is active.)
4. The alarm tone will switch on automatically at the pre-set alarm time.
5. The alarm can be temporarily stopped for 9 minutes by pressing the Snooze Button (5)
once. This can be repeated up to 5 times.
6. The alarm will switch off automatically after 1 hour 59 minutes or can be cancelled by
switching the Power Selector (11) to the “OFF” position.
7. The alarm will activate again after 24 hours unless the Function Selector (11) is set to
“OFF”.
SLEEP TO RADIO
The radio can be set to switch off automatically after a period of time from 1 minute to 1 hour
and 59 minutes, by following this procedure:-
With all the controls pre-set in the “WAKE TO RADIO”, or the Function Selector (11) in the
“OFF” position, press simultaneously the Sleep Set Button (8) and the Minute Set Button (9),
or Hour Set Button (10) until the display shows the exact sleep time you wish the radio to play
before switch off. To switch off the radio before the end of the programmed sleep time period,
simply press the Snooze Button (5) once.
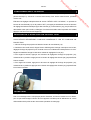
SETTING PROJECTION CLOCK
There are two separate clocks in this product.
THE LED DIGITAL CLOCK AND THE PROJECTION CLOCK MUST BE SET SEPARATELY.
1. Switch on the projection clock with the Projection On/Off Selector (16).
2. Hold the clock radio with the clock display face down and the projection clock hinged out to
face a dimly-lit wall opposite the projector.
Focus the projection clock with the FOCUS thumbwheel (20).
3. To set the HOURS, press and hold the Projection Time Set Button (19) then repeatedly
press the Projection Hour Set Button (22). Until the hour you require is displayed.
4. To set the MINUTES, press and hold the Projection Time Set Button (19) then repeatedly

Downloaded from www.vandenborre.be
ENGLISH
6
press the Projection Minute Set Button (21) until the minute you require is displayed.
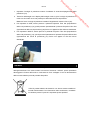
CLEANING
Clean the cabinet with a soft cloth moistened with water or mild detergent. Do not use solvents
such as alcohol, benzene or thinner, as they may damage the cabinet finish. Make sure to
disconnect the mains lead from the supply before cleaning.
Waste electrical and electronic products must not be disposed of with
household waste. Please refer to the retailer from whom you purchased this
item for disposal instructions.
Batteries and packaging materials should be recycled using local facilities.
UK Help Line
If you have read these instructions and troubleshooting guide, but there is something about this
equipment which you do not understand or does not work. You can phone our help line (during normal
office hours) on: 0113 279 3520. Calls are charged at standard rates.
We have made every effort to ensure these instructions are as accurate as possible, however we
apologise for any inconvenience caused by minor inconsistencies which may occur as a result of product
improvement and development.

Downloaded from www.vandenborre.be
FRENCH
1
INFORMATIONS DE SÉCURITÉ
1. Objets et liquides – Une attention particulière doit être exercée afin qu’aucun objet ne
tombe et afin qu’aucun liquide ne soit versé dans le boîtier par ses ouvertures.
2. Eau et humidité – L’appareil ne doit pas être utilisé près de l’eau ; par exemple, près d’une
baignoire, d’un lavabo, d’un évier de cuisine, d’une cuve à linge, dans un sous-sol humide
ou près d’une piscine ou lieu similaire.
3. La ventilation ne doit pas être obstruée en couvrant les ouvertures d’aération avec des
objets, comme des journaux, des nappes, des rideaux etc.
4. Aucune flamme vive, comme une bougie allumée, ne doit être placée sur l’appareil.
5. L’appareil ne doit pas être exposé à des gouttes ou à des éclaboussures et aucun objet
rempli de liquide, comme un vase, ne doit être posé sur l’appareil.
6. Ne placez pas le produit dans un meuble ou sur une étagère fermée sans une correcte
ventilation.
7. Si la prise d’alimentation ou un couple électrique est utilisé pour déconnecter l’appareil, le
système de déconnexion doit rester facilement accessible.
• Précautions : Lisez attentivement les instructions de manipulation et de sécurité, et
appliquez-les scrupuleusement avant d'utiliser votre radio-réveil à projection.
• Placez cette "horloge magique" hors de portée des enfants et des bébés.
• N'essayez pas de démonter ou modifier toute pièce de votre appareil autrement que
pour les opérations décrites expressément dans ce guide. De telles initiatives vous
exposent à des risques d'électrocution. Les contrôles internes, modifications et
réparations doivent être confiées uniquement à un technicien qualifié.
• Ne touchez à aucune partie interne mise à nue à la suite d'un dommage. Vous risquez
une électrocution. Rapportez votre appareil au magasin où vous l'avez acheté.
• Évitez tout contact de votre appareil avec de l'eau ou un autre liquide et ne le plongez
jamais dans de l'eau ou un autre liquide.
• N'utilisez jamais de produit contenant de l'alcool, de l'essence, un diluant ou toute autre
substance inflammable pour nettoyer ou entretenir votre appareil.
• Ne touchez pas le cordon d'alimentation secteur avec des mains humides.
• Utilisez votre appareil uniquement avec les types de source d'énergie et batterie
recommandés expressément par le constructeur pour éviter tout risque de surchauffe,
dysfonctionnement, incendie, électrocution et autres dangers.
• Ne placez pas votre radio-réveil à proximité d'une flamme nue.
• N'essayez pas de démonter, modifier ou chauffer la batterie.

Downloaded from www.vandenborre.be
FRENCH
2
• N'utilisez pas, ne posez pas et ne rangez pas votre appareil dans un endroit exposé à
la lumière directe du soleil ou toute autre source de température élevée. Les batteries
sont en effet sensibles à de trop fortes températures et peuvent alors fuir, surchauffer
ou éclater, avec pour conséquence des risques de début d'incendie, de brûlure ou
autre dommage. Notez qu'une température trop élevée peut également déformer le
boîtier d'habillage de votre radio-réveil.
• Ne rangez pas votre appareil dans un endroit humide ou poussiéreux.
• Ne placez jamais votre radio-réveil à projection près d'un moteur électrique ou tout
autre équipement produisant des champs électromagnétiques de forte intensité.
L'exposition à de tels champs peut perturber le bon fonctionnement de votre appareil
ou déformer l'image.
• Ne placez pas votre radio-réveil à projection à un endroit soumis à des vibrations ni aux
bords d'une table.
• Ne regardez pas directement l'objectif du projecteur pour ne pas endommager de
façon permanente votre vue.
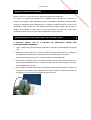
EMPLACEMENT DES CONTRÔLES

Downloaded from www.vandenborre.be
FRENCH
3
1. Écran de l'horloge numérique à LED
2. Contrôle de volume – Marche/arrêt de la
sonnerie
3. Contrôle de station
4. Sélecteur de fréquence
5. Contrôle de rappel
6. Bouton de réglage du réveil
7. Bouton de réglage de l'horloge
8. Bouton d'arrêt automatique
9. Bouton de réglage des minutes
10. Bouton de réglage des heures
11. Bouton de marche/arrêt
12. Antenne FM (placée à l'arrière)
13. Indicateur de mode automatique
14. Compartiment de la batterie (placé à
l'arrière)
15. Cordon d'alimentation secteur (placé à
l'arrière)
16. Bouton de marche/arrêt de la projection
(sur la gauche)
17. Boîtier du projecteur
18. Objectif du projecteur
19. Bouton T
20. Molette de réglage du focus
21. Bouton M
22. Bouton H
RÉGLAGE DE L'HORLOGE
REMARQUE : Votre appareil intègre deux horloges distinctes.
1. Placez le bouton de marche/arrêt (11) en position OFF (Arrêt). Branchez le cordon
d'alimentation sur la prise secteur. L'écran de l'horloge principale clignote, indiquant que l'heure
n'est plus exacte suite à une interruption de l'alimentation en courant. L'horloge de projetction,
elle, ne clignote pas après une interruption de courant.
2. Pour régler l'heure, appuyez sur le bouton de réglage de l'horloge (7), maintenez-le en
position et appuyez sur les boutons de réglage des heures (10) et des minutes (9), jusqu'à
afficher l'heure exacte. Relâchez alors tous les boutons.
3. Ouvrez le compartiment de batterie (14) placé en dessous de votre appareil et insérez une
batterie 9 volts 6LR61 (ou équivalente). Cette batterie vous permet de conserver le réglage de
l'alarme et d'assurer un fonctionnement continu de l'horloge en cas de panne de courant ou de
débranchement du cordon d'alimentation. Notez que l'alimentation par batterie ne vous permet
pas d'allumer l'écran d'affichage.
REMARQUE : Lorsque votre horloge fonctionne depuis la batterie, l'heure ne reste précise que
pendant une courte période. Vous devez donc vous dépêcher de rétablir l'alimentation secteur.
RÉGLAGE DU RÉVEIL
1. Appuyez sur le bouton de réglage du réveil (6), maintenez-le en position et appuyez sur les
boutons de réglage des heures (10) et des minutes (9), jusqu'à afficher l'heure à laquelle
vous voulez vous réveiller. Relâchez tous les boutons.
2. Pour vérifier votre réglage, appuyez sur le bouton de réglage du réveil (6). L'heure de réveil
choisie apparaît sur l'écran d'affichage.
UTILISATION DE LA RADIO

Downloaded from www.vandenborre.be
FRENCH
4
La réception AM est assurée par une antenne directionnelle interne. Si elle n'est pas de très
bonne qualité, essayez de modifier l'orientation de votre appareil pour l'améliorer. Pour recevoir
la FM, déroulez complètement le fil d'antenne FM (12) placé à l'arrière de votre appareil.
1. Placez le bouton de marche/arrêt (11) sur la position "ON (Marche)".
2. Poussez le sélecteur de fréquence (4) sur la plage de fréquences désirée (AM ou FM).
3. Tournez le contrôle de station (3) jusqu'à atteindre la station que vous voulez entendre.
4. Tournez le contrôle de volume (2) sur le niveau désiré.
5. Pour arrêter la radio, poussez le bouton de marche/arrêt (11) sur la position "OFF (Arrêt)".
Si la radio continue malgré tout de fonctionner, vous avez probablement actionné
accidentellement le bouton d'arrêt automatique (8). Pour désactiver cette fonction, appuyez
une fois sur le bouton de rappel (5).
RÉVEIL AVEC LA RADIO
Sélectionnez la station que vous voulez écouter à votre réveil ainsi que le niveau de volume
désiré, puis opérez comme suit :
1. Réglez l'heure de réveil comme indiqué dans la section "RÉGLAGE DU RÉVEIL".
2. Ce réglage effectué, poussez le bouton de marche/arrêt (11) sur la position "AUTO".
3. La radio s'allumera automatiquement à l'heure choisie.
4. Pour l'interrompre temporairement pendant 9 minutes, appuyez une fois sur le bouton
Rappel (5). Vous pouvez effectuer jusqu'à 5 rappels de réveil.
5. La radio s'arrête automatiquement après 1 heure 59 minutes. Pour l'arrêter plus tôt, poussez
le bouton de marche/arrêt (11) sur la position "OFF (Arrêt)".
6. Si vous laissez la radio s'arrêter automatiquement, elle se fera de nouveau entendre le
lendemain à la même heure de réveil, sauf si vous poussez le bouton de marche/arrêt (11) sur
la position "OFF (Arrêt)".
RÉVEIL AVEC LA SONNERIE
1. Réglez l'heure de réveil comme indiqué dans la section "RÉGLAGE DU RÉVEIL".
2. Ce réglage effectué, poussez le bouton de marche/arrêt (11) sur la position "AUTO".
3. Tournez complètement le contrôle de volume (2) dans le sens des aiguilles d'une montre
pour sélectionner la fonction BUZZ (SONNERIE). Un "clic" vous indique que cette fonction est
active.
4. La sonnerie du réveil sera déclenchée automatiquement à l'heure de réveil choisie.
5. Pour l'interrompre temporairement pendant 9 minutes, appuyez une fois sur le bouton
Rappel (5). Vous pouvez effectuer jusqu'à 5 rappels de réveil.
6. La sonnerie s'arrête automatiquement après 1 heure 59 minutes. Pour l'arrêter plus tôt,
poussez le bouton de marche/arrêt (11) sur la position "OFF (Arrêt)".
7. Si vous laissez la sonnerie s'arrêter automatiquement, elle se fera de nouveau entendre le
lendemain à la même heure de réveil, sauf si vous poussez le bouton de marche/arrêt (11) sur
la position "OFF (Arrêt)".

Downloaded from www.vandenborre.be
FRENCH
5
S'ENDORMIR AVEC LA RADIO
Vous pouvez programmer votre radio pour s'éteindre automatiquement après une certaine
période de temps (1 minute à 1 heure et 59 minutes). Pour activer cette fonction, procédez
comme suit :
Effectuez les réglages indiquées dans la section "RÉVEIL AVEC LA RADIO", ou poussez le
bouton de marche/arrêt (11) sur la position "OFF" puis appuyez simultanément sur les boutons
de réglage de l'arrêt automatique (8) et des minutes (9), ou des heures (10), jusqu'à afficher le
délai désiré avant que la radio ne s'éteigne. Pour éteindre la radio avant l'expiration de ce délai,
appuyez une fois sur le bouton Rappel (5).
RÉGLAGE DE L'HORLOGE DE PROJECTION
Votre appareil intègre deux horloges distinctes.
VOUS RÉGLEZ SÉPARÉMENT L'HORLOGE NUMÉRIQUE À LED ET L'HORLOGE DE
PROJECTION.
1. Allumez l'horloge de projection à l'aide du bouton de marche/arrêt (16).
2. Saisissez votre radio-réveil, dirigez l'écran d'affichage de l'horloge numérique vers le bas,
dégagez l'horloge de projection pour l'orienter vers un mur faiblement éclairé placé en vis-à-vis.
Réglez la netteté de l'image à l'aide de la molette de réglage du focus (20).
3. Pour régler les heures, appuyez sur le bouton de réglage de l'horloge de projection (19),
maintenez-le en position et appuyez sur le bouton de réglage des heures (22) jusqu'à afficher
l'heure actuelle.
4. Pour régler les minutes, appuyez sur le bouton de réglage de l'horloge de projection (19),
maintenez-le en position et appuyez sur le bouton de réglage des minutes (21) jusqu'à afficher
les minutes actuelles.
ENTRETIEN
Nettoyez l'extérieur de votre radio-réveil avec un chiffon doux légèrement mouillé avec de
l'eau ou un détergent doux. N'employez pas de dissolvant, tel l'alcool, l'essence ou un diluant,
pour ne pas endommager la finition de votre appareil. N'oubliez pas de débrancher le cordon
d'alimentation de la prise secteur avant toute opération de nettoyage.


Downloaded from www.vandenborre.be
DUTCH
1
VEILIGHEIDSINFORMATIE
1. Voorwerpen en Vloeistoffen – Zorg ervoor dat geen voorwerpen of vloeistoffen
terechtkomen in het toestel via de openingen.
2. Water en vochtigheid – Gebruik het toestel niet nabij water, bijvoorbeeld, in de buurt van
een badkuip, wasbak, keukengootsteen, afwasbak, zwembad of in een vochtige kelder.
3. De ventilatie mag niet gehinderd worden door de ventilatieopeningen te bedekken met
voorwerpen, zoals kranten, tafeldoeken, gordijnen, etc.
4. Plaats geen open vlammen, zoals aangestoken kaarsen, bovenop dit toestel.
5. Stel dit toestel niet bloot aan druppels of spatten en plaats geen objecten gevuld met
vloeistoffen, zoals vazen, bovenop dit toestel.
6. Plaats dit toestel niet in gesloten boekenkasten of rekken zonder een correcte ventilatie.
7. Wanneer de stroomstekker of een toestelstopcontact wordt gebruikt als afkoppelingtoestel
dan moet deze afkoppeling altijd rechtstreeks en onmiddellijk bruikbaar zijn.
• Veiligheidsvoorzorgen: gelieve de instructies in verband met het gebruik en de
veiligheid in deze gebruiksaanwijzing te lezen voordat u de projectiewekker begint te
gebruiken.
• Installeer deze Magische Wekker buiten het bereik van kinderen en baby’s.
• Probeer geen enkel onderdeel van dit apparaat te demonteren of wijzigen tenzij dit in
deze gebruiksaanwijzing wordt aangewezen. Demontage of modificatie kan een risico
voor elektrocutie door hoogspanning veroorzaken. Interne inspecties, wijzigen en
herstellingen mogen uitsluitend door gekwalificeerde technici worden uitgevoerd.
• Raak nadat het apparaat beschadigd werd nooit de interne onderdelen aan. Dit houdt
een risico voor elektrocutie door hoogspanning in. Breng het apparaat in dergelijke
gevallen terug naar de winkel waar u het aankocht.
• Laat het apparaat niet in contact komen met water of andere vloeistoffen en dompel het
nooit onder in een vloeistof.
• Gebruik om dit apparaat schoon te maken of een onderhoudsbeurt te geven geen
schoonmaakproducten die alcohol, benzeen, verfverdunners of andere ontvlambare
stoffen bevatten.
• Raak het netsnoer niet aan wanneer uw handen nat zijn.
• Het gebruik van stroombronnen of batterijen die niet uitdrukkelijk worden aanbevolen
voor dit apparaat kan oververhitting, een slechte werking, brand, elektrocutie of andere
gevaren inhouden. Gebruik uitsluitend de aanbevolen stroombronnen.
• Plaats geen naakte vlammen zoals kaarsen bovenop of vlakbij dit apparaat.

Downloaded from www.vandenborre.be
DUTCH
2
• Probeer de batterijen nooit te demonteren, wijzigen en stel ze nooit aan hitte bloot.
• Gebruik, installeer of bewaar het apparaat niet waar het aan sterk zonlicht of extreme
temperaturen kan worden blootgesteld. Door blootstelling aan intens zonlicht of hitte
kunnen de batterijen gaan lekken, oververhitten of ontploffen, wat brand, brandwonden
en andere verwondingen kan veroorzaken. Hoge temperaturen kunnen de behuizing
ook doen vervormen.
• Bewaar dit apparaat niet in vochtige of stoffige plaatsen.
• Installeer de projectiewekker nooit vlakbij elektrische motoren of andere apparatuur die
sterke elektromagnetische velden creëren. Door blootstelling aan sterke magnetische
velden kan het apparaat abnormaal gaan functioneren of het beeld gaan vervormen.
• Installeer de projectiewekker niet in plaatsen waar veel trillingen voorkomen of op
tafelranden.
• Kijk nooit rechtstreeks in de projectorlens omdat dit permanente oogschade kan
veroorzaken.
LOCATIE VAN DE BEDIENINGSTOETSEN

Downloaded from www.vandenborre.be
DUTCH
3
1. LED digitale klokdisplay
2. Knop Volume – Buzz On / Off (volume –
zoemer aan / uit)
3. Tuning (afstemknop)
4. Keuzeschakelaar Waveband
(golfband)
5. Instelknop Snooze (sluimerfunctie)
6. Insteltoets Alarm Set (wekker)
7. Insteltoets Time Set (tijd)
8. Insteltoets Sleep Set (inslaapduur)
9. Insteltoets Minute Set (minuten)
10. Insteltoets Hour Set (uur)
11. Schakelaar Power (stroom)
12. FM-antenna (aan de achterzijde van
het apparaat)
13. De indicator Auto
14. Deksel batterijenvak (op de
onderzijde van het apparaat)
15. NETSNOER (aan de achterzijde van
het apparaat)
16. Keuzeschakelaar Projection On/Off
(projectie aan / uit)
(op de linkerzijde van het apparaat)
17. Behuizing van de projector
18. Projectorlens
19. T-toets
20. Duimwiel voor het scherpstellen
21. M-toets
22. H-toets
INSTELLEN VAN DE HUIDIGE TIJD
OPMERKING: Dit apparaat is uitgerust met twee afzonderlijke horloges.
Schakel de schakelaar POWER (stroom) (11) naar de stand ”OFF” (uit). Stop de stekker
van het netsnoer in een stopcontact. De klokdisplay met de huidige tijd knippert,
aangevend dat er een stroomonderbreking is geweest en dat de tijd op de display moet
ingesteld worden. Gelieve te noteren dat de projectieklok niet knippert na een
stroomonderbreking!
Houd om de correcte tijd in te stellen de insteltoets Time Set (tijd) (7) ingedrukt en druk
dan op de insteltoets Hour Set (uur) (10) of Minute Set (minuten) (9) tot de correcte tijd op
de display is aangegeven. (Laat daarna alle toetsen los).
Open het deksel van het batterijenvak (14) op de onderzijde van het apparaat en zet een
batterij van het type 6LR61 (of equivalent) van 9 volt in. Deze batterij doet dienst als
back-up voor het geheugen, waarin informatie over de ingestelde wekkertijd wordt
opgeslagen en dat de klok lopende houdt in geval van stroomonderbreking of wanneer het
apparaat van de stroom wordt losgekoppeld. In dergelijke gevallen blijft de klok lopen,
hoewel de tijd niet op de display wordt aangegeven.
OPMERKING: op alleen de batterij kan de klok maar een korte tijd nauwkeurig blijven werken.
Het is belangrijk dat de stroomvoeding zo snel mogelijk wordt hersteld.
INSTELLEN VAN DE WEKKER
1. Houd de insteltoets Alarm (wekker) (6) ingedrukt en druk herhaaldelijk op de
insteltoets Hour Set (uur) (10) en dan op de insteltoets Minute Set (minuten) (9) tot de

Downloaded from www.vandenborre.be
DUTCH
4
gewenste wekkertijd op de display verschijnt. (Laat daarna alle toetsen daarna los.)
2. Om de wekkertijd na te kijken drukt u eenvoudig op de insteltoets Alarm Set (wekker)
(6). De ingestelde wekker tijd wordt dan op de display aangegeven
.
DE WERKING VAN DE RADIO
Dit apparaat gebruikt voor de AM-ontvangst een interne richtingantenne. Draai het apparaat tot
u de beste ontvangst verkrijgt. Voor de FM-ontvangst moet de FM-antenna aan de achterzijde
van het apparaat (12) volledig uitgestrekt worden.
1. Schakel de schakelaar Power (stroom) (11) naar de stand “ON” (aan).
2. Schakel de keuzeschakelaar Waveband (golfband) (4) naar de gewenste golfband (AM
of FM).
3. Gebruik de knop Tuning (afstemknop) (3) om op de gewenste radiozender af te
stemmen.
4. Stel de knop Volume (2) in op het gewenste luisterniveau.
5. Schakel om de radio uit te schakelen de schakelaar Power (stroom) (11) naar de
stand ”OFF” (uit). Wanneer de radio niet uitschakelt kan dit het gevolg zijn van het
gebruik van de insteltoets Sleep Set (inslaapduur) (8). Om deze functie te annuleren
drukt u eenmaal op de instelknop Snooze (sluimerfunctie) (5).
OM GEWEKT TE WORDEN DOOR DE RADIO
Nadat u op de gewenste zender heeft afgestemd en een comfortabel luisterniveau heeft
ingesteld gaat u als volgt tewerk:
1. Volg de bovenstaande instructies voor het “INSTELLEN VAN DE WEKKERTIJD”.
2. Schakel nadat de gewenste wekkertijd is ingesteld de schakelaar Power (stroom) (11)
naar de stand “AUTO” (automatisch).
3. De radio schakelt automatisch aan op de ingestelde wekkertijd.
4. De wekker kan tijdelijk worden gestopt voor een periode van 9 minuten door eenmaal
te drukken op de instelknop Snooze (sluimerfunctie) (5). U kunt dit tot 5 keer herhalen.
5. De wekker schakelt na 1 uur en 59 minuten automatisch uit of kan eerder worden
gestopt door de schakelaar Function (stroom) (11) naar de stand “OFF” (uit) te
schakelen.
De wekker activeert 24 uur later opnieuw, tenzij de schakelaar Function (stroom) (11) naar de
stand “OFF” (uit) is geschakeld .
OM GEWEKT TE WORDEN DOOR DE WEKKER
1. Volg de bovenstaande instructies voor het “INSTELLEN VAN DE WEKKERTIJD”.
2. Schakel nadat de gewenste wekkertijd is ingesteld de schakelaar Function (stroom) (11)
naar de stand “AUTO.
3. Draai de knop Volume (2) in de richting van de klok volledig om, om de zoemerfunctie
BUZZ te selecteren. (U hoort een KLIKGELUID wanneer deze functie geactiveerd is.)
4. De wekkertoon schakelt automatisch aan op de ingestelde wekkertijd.

Downloaded from www.vandenborre.be
DUTCH
5
5. De wekker kan tijdelijk worden gestopt voor een periode van 9 minuten door eenmaal
te drukken op de instelknop Snooze (sluimerfunctie) (5). U kunt dit tot 5 keer herhalen.
6. De wekker schakelt na 1 uur en 59 minuten automatisch uit of kan eerder gestopt
worden door de schakelaar Function (stroom) (11) naar de stand “OFF” (uit) te
schakelen.
7. De wekker schakelt 24 uur later weer aan, tenzij de schakelaar Function (stroom) (11)
naar de stand “OFF” (uit) is geschakeld .
INSLAPEN MET DE RADIO
De radio kan worden ingesteld om automatisch uit te schakelen na een periode tussen 1 uur en
59 minuten. Volg hiervoor de onderstaande werkwijze:
Nadat alle instellingen van “OM GEWEKT TE WORDEN DOOR DE RADIO” zijn gedaan of de
schakelaar Function (stroom) (11) naar de stand “OFF” (uit) is geschakeld, drukt u tegelijkertijd
op de insteltoets Sleep Set (inslaapduur) (8) en de insteltoets Minute Set (minuten) (9) of Hour
Set (uur) (10) tot de gewenste tijdsduur op de display is aangegeven, waarin u wilt inslapen met
de radio en waarna de radio automatisch moet uitschakelen. Om de radio uit te schakelen
voordat de geprogrammeerde inslaaptijd is verstreken drukt u eenvoudig eenmaal op de
instelknop Snooze (sluimerfunctie) (5).
INSTELLEN VAN DE PROJECTIEKLOK
Deze wekker is uitgerust met twee afzonderlijke horloges.
DE LED DIGITALE KLOK EN DE PROJECTIEKLOK MOETEN AFZONDERLIJK WORDEN
INGESTELD!
1. Schakel de projectieklok aan met behulp van de keuzeschakelaar Projection On/Off
(projectie aan / uit) (16).
2. Houd de wekkerradio vast met de klokdisplay naar onder gericht en de projectieklok
uitgeklapt en gericht op een donkere muur. Stel de geprojecteerde tijd scherp met
behulp van het duimwiel FOCUS (scherpstellen) (20).
3. Druk om het UUR in te stellen op de insteltoets Projection Time Set (T: projectietijd)
(19) en druk dan herhaaldelijk op de insteltoets Projection Hour Set (H: Projectie-uur)
(22) tot het gewenste uur op de display is aangegeven.
4. Druk om de MINUTEN in te stellen op de insteltoets Projection Time Set (T:
projectietijd) (19) en druk dan herhaaldelijk op de insteltoets Projection Minute Set (M:
projectieminuten) (21) tot het gewenste aantal minuten op de display zijn aangegeven.

Downloaded from www.vandenborre.be
DUTCH
6
SCHOONMAKEN
Maak de behuizing schoon met een zachte doek die met een weinig water of zachte detergent
bevochtigd is. Gebruik nooit schoonmaakproducten die alcohol, benzeen of verfverdunners
bevatten, omdat dergelijke producten de afwerking van de behuizing kunnen beschadigen.
Vergeet niet de stekker uit het stopcontact te verwijderen voordat u het apparaat begint schoon
te maken.
"Elektronische afvalstoffen dienen niet weggegooid te worden met het
huisafval. Breng dit materiaal terug naar uw electro-speciaalzaak voor
een veilige verwerking, of indien dit niet mogelijk is, naar het inname
punt in uw gemeente.

Downloaded from www.vandenborre.be
ITALIAN
1
INFORMAZIONI DI SICUREZZA
1. Penetrazione di oggetti e liquidi – Fare attenzione che all’interno dell’apparecchio non
penetrino oggetti o liquidi attraverso le aperture.
2. Acqua e umidità – Gli apparecchi non devono essere utilizzati vicino all’acqua, ad esempio
vicino a una vasca da bagno, un lavandino, un lavabo da cucina, una tinozza per il bucato,
in un seminterrato umido o vicino a una piscina o simili.
3. Non ostacolare la corretta ventilazione coprendo le aperture di ventilazione con oggetti
come giornali, tovaglie, tende, ecc.
4. Non collocare sull’apparecchio fonti di fiamme libere come le candele.
5. Non esporre l’apparecchio a gocce o spruzzi e non collocare sull’apparecchio oggetti
contenenti liquidi come i vasi.
6. Non collocare l’apparecchio su supporti come scaffali o librerie chiuse se non è garantita
la corretta ventilazione.
7. Quando si utilizza una spina di rete o un accoppiatore come dispositivo di scollegamento,
il dispositivo di scollegamento deve essere facilmente raggiungibile.
•
Precauzioni: Assicurarsi di leggere e rispettare le precauzioni di sicurezza e
manutenzione contenute in questa guida prima di utilizzare l’orologio con proiettore.
• Collocare questo Orologio magico lontano dalla portata dei bambini.
• Non cercare di smontare o alterare qualsiasi componente dell’apparecchiatura che
non sia espressamente descritto nella presente guida. Lo smontaggio e l’alterazione
potrebbero causare scosse elettriche ad alta tensione. Eventuali controlli, alterazioni e
riparazioni interne devono essere effettuate soltanto dal personale di assistenza
qualificato.
• Non toccare mai le parti interne dell’apparecchio se dovessero rimanere esposte in
conseguenza di danni. Può verificarsi il rischio di scossa elettrica ad alta tensione.
Riportare l’apparecchio presso il rivenditore dove lo si è acquistato.
• Non lasciare che l’apparecchio venga a contatto o venga immerso in acqua o altri
liquidi.
• Non usare sostanze contenenti alcool, benzene, diluenti o altre sostanze infiammabili
per la pulizia o la manutenzione dell’apparecchio.
• Non toccare il cavo di alimentazione con le mani bagnate.
• L’uso di dispositivi di alimentazione o batterie non espressamente raccomandate per
questo apparecchio può provocare il surriscaldamento, il malfunzionamento
dell’apparecchio, incendi, scosse elettriche o altri rischi. Adoperare soltanto dispositivi
di alimentazione raccomandati.
• Non collocare sorgenti di fiamme scoperte vicino o sopra questo apparecchio.
Stránka se načítá ...
Stránka se načítá ...
Stránka se načítá ...
Stránka se načítá ...
Stránka se načítá ...
Stránka se načítá ...
Stránka se načítá ...
Stránka se načítá ...
Stránka se načítá ...
Stránka se načítá ...
Stránka se načítá ...
Stránka se načítá ...
Stránka se načítá ...
Stránka se načítá ...
Stránka se načítá ...
Stránka se načítá ...
Stránka se načítá ...
Stránka se načítá ...
Stránka se načítá ...
Stránka se načítá ...
Stránka se načítá ...
Stránka se načítá ...
Stránka se načítá ...
Stránka se načítá ...
Stránka se načítá ...
Stránka se načítá ...
Stránka se načítá ...
Stránka se načítá ...
Stránka se načítá ...
-
 1
1
-
 2
2
-
 3
3
-
 4
4
-
 5
5
-
 6
6
-
 7
7
-
 8
8
-
 9
9
-
 10
10
-
 11
11
-
 12
12
-
 13
13
-
 14
14
-
 15
15
-
 16
16
-
 17
17
-
 18
18
-
 19
19
-
 20
20
-
 21
21
-
 22
22
-
 23
23
-
 24
24
-
 25
25
-
 26
26
-
 27
27
-
 28
28
-
 29
29
-
 30
30
-
 31
31
-
 32
32
-
 33
33
-
 34
34
-
 35
35
-
 36
36
-
 37
37
-
 38
38
-
 39
39
-
 40
40
-
 41
41
-
 42
42
-
 43
43
-
 44
44
-
 45
45
-
 46
46
-
 47
47
-
 48
48
-
 49
49


Proline CR75P Operativní instrukce
- Kategorie
- Rádia
- Typ
- Operativní instrukce
v jiných jazycích
- español: Proline CR75P Instrucciones de operación
- italiano: Proline CR75P Istruzioni per l'uso
- slovenčina: Proline CR75P Návod na používanie
- português: Proline CR75P Instruções de operação
- français: Proline CR75P Mode d'emploi
- English: Proline CR75P Operating instructions
- Nederlands: Proline CR75P Handleiding
Jiné dokumenty
-
Philips AJ3160/00C Uživatelský manuál
-
-
Brandt BCR181 Uživatelský manuál
-
König HAV-CR26WH Specifikace
-
König HAV-CR25GR Specifikace
-
Elta 4218N1 Uživatelský manuál
-
AudioSonic CL-1491 Návod k obsluze
-
AudioSonic CL-1470 Uživatelský manuál
-
Silvercrest SFPW 360 B1 Operating Instructions Manual
-
AudioSonic CL-1485 Návod k obsluze