Samsung LE32A550P1R Uživatelský manuál

Kategorie
LCD televizory
Typ
Uživatelský manuál
Country
Customer Care Centre
Web Site
AUSTRIA 0800-SAMSUNG (726-7864) www.samsung.com/at
BELGIUM 0032 (0)2 201 24 18 www.samsung.com/be
CZECH REPUBLIC
844 000 844 www.samsung.com/cz
Distributor pro Českou republiku:
Samsung Zrt., česka organizační složka Vyskočilova 4, 14000 Praha 4
DENMARK 70 70 19 70 www.samsung.com/dk
EIRE 0818 717 100 www.samsung.com/ie
FINLAND 030-6227 515 www.samsung.com/
FRANCE
3260 SAMSUNG (€ 0,15/Min)
08 25 08 65 65 (€ 0,15/Min)
www.samsung.com
GERMANY 01805 - SAMSUNG (726-7864) (€ 0,14/Min) www.samsung.com
HUNGARY 06-80-SAMSUNG (726-7864) www.samsung.com
ITALIA 800-SAMSUNG (726-7864) www.samsung.com
LUXEMBURG 0035 (0)2 261 03 710 www.samsung.com/be
NETHERLANDS 0900-SAMSUNG (726-7864) (€ 0,10/Min) www.samsung.com/nl
NORWAY 815-56 480 www.samsung.com/no
POLAND
0 801 801 881
022-607-93-33
www.samsung.com/pl
PORTUGAL 80820-SAMSUNG (726-7864) www.samsung.com/pt
SLOVAKIA 0800-SAMSUNG (726-7864) www.samsung.com/sk
SPAIN 902 10 11 30 www.samsung.com
SWEDEN 0771-400 200 www.samsung.com/se
SWITZERLAND 0800-SAMSUNG (726-7864) www.samsung.com/ch
U.K 0845 SAMSUNG (7267864) www.samsung.com
TURKEY 444 77 11 www.samsung.com
ESTONIA 800-7267 www.samsung.ee
LATVIA 800-7267 www.samsung.com/lv
LITHUANIA 8-800-77777 www.samsung.lt
KAZAHSTAN 8-10-800-500-55-500 www.samsung.kz
KYRGYZSTAN 00-800-500-55-500 -
RUSSIA 8-800-555-55-55 www.samsung.com
TADJIKISTAN 8-10-800-500-55-500 -
UKRAINE 8-800-502-0000 www.samsung.com
UZBEKISTAN 8-10-800-500-55-500 www.samsung.uz
LCD TV
user manual
imagine the possibilities
Thank you for purchasing this Samsung product.
To receive more complete service, please register
your product at
www.samsung.com/global/register
Model Serial No.
BN68-01410A-00
Contact SAMSUNG WORLDWIDE
If you have any questions or comments relating to Samsung products,
please contact the SAMSUNG customer care centre.
BN68-01410A-����-0127.indd 1 2008-02-21 �� 4:18:30
English - 3
Viewing the Control Panel
The product colour and shape may vary depending on the model.
1
SOURCE
Toggles between all the available input sources
(TV, Ext.1, Ext.2, AV, S-Video, Component, PC,
HDMI1, HDMI2, HDMI3). In the on-screen menu,
use this button as you use the
ENTER
button
on the remote control.
5
Power Indicator
Blinks and turns off when the power is on and
lights up in stand-by mode.
6
(Power)
Press to turn the TV on and off.
7
Remote Control Sensor
Aim the remote control towards this spot on
the TV.
8
Speakers
2
MENU
Press to see an on-screen menu of your TV’s
features.
3
Press to decrease or increase the volume. In the
on-screen menu, use the buttons as you
use the ◄ and ► buttons on the remote control.
4
Press to change channels.
In the on-screen menu, use the
buttons as you use the
and
buttons on
the remote control.
(Without the Remote Control, you can turn on
the TV by using the Channel buttons.)
Front Panel buttons
Touch each button to
operate.
Side Panel buttons
8 8
4
1
2
3
5
6
7
1
2
3
4
6
7
58 8
BN68-01410A-00Eng-0220.indd 3 2008-02-20 �� 11:31:01
English - 8
Viewing the Menus
1. With the power on, press the MENU button.
The main menu appears on the screen. The menu’ s left side has
icons: Picture, Sound, Channel, Setup, Input.
2. Press the ▲ or ▼ button to select one of the icons.
Then press the
ENTER
button to access the icon’s sub-menu.
3. Press the EXIT button to exit.
The on-screen menus disappear from the screen after about
one minute.
Using the TOOLS Button
You can use the TOOLS button to select your frequently
used functions quickly and easily. The “Tools” menu change
depending on which external input mode you are viewing.
1. Press the TOOLS button.
The “Tools” menu will appear.
2. Press the ▲ or ▼ button to select a menu.
3. Press the ▲/▼/◄/►/
ENTER
buttons to display, change, or
use the selected items. For a more detailed description of each
function, refer to the corresponding page.
Anynet+ (HDMI-CEC), see page 38
Picture Mode, see page 15
Sound Mode, see page 21
Sleep Timer, see page 23
SRS TS XT, see page 21
Energy Saving, see page 26
Dual l-ll, see page 22
PIP, see page 20
Auto Adjustment, see page 29
Tools
Anynet+ (HDMI-CEC)
Picture Mode : Standard
Sound Mode : Custom
Sleep Timer : Off
SRS TS XT : Off
Energy Saving : Off
Dual l-ll : Mono
Move Enter Exit
Picture
Mode : Standard
Backlight 7
Contrast 95
Brightness 45
Sharpness 50
Colour 50
Tint G50 R50
Detailed Settings
sMore
TV
Move Enter Return
BN68-01410A-00Eng-0220.indd 8 2008-02-20 �� 11:31:04
English - 12
Adding / Locking Channels
Using the Channel Manager, you can conveniently lock or add
channels.
1. Press the MENU button to display the menu.
Press the or button to select "Channel", then press the
ENTER
button.
2. Press the or button to select "Channel Manager", then
press the
ENTER
button.
Adding channels
Using the Channel List, you can add channels.
3. Select Channel List by pressing the
ENTER
button.
4. Move to the ( ) eld by pressing the ▲, ▼, ◄ or ►
button, select a channel to be added, and press the
ENTER
button to add the channel.
If you press the
ENTER
button again, the ( ) symbol
next to the channel disappears and the channel is not
added.
” is active when "Child Lock" is selected to "On".
Locking channels
This feature allows you to prevent unauthorized users, such as
children, from watching unsuitable programmes by muting out
video and audio.
5. Press the ▲ or ▼ button to select "Child Lock", then press the
ENTER
button.
6. Select "On" by pressing the ▲ or ▼ button, then press the
ENTER
button.
7. Press the ▲ or ▼ button to select "Channel List", then press
the
ENTER
button.
8. Move to the ( ) eld by pressing the ▲, ▼, ◄ or ► button,
select a channel to be locked, and press the
ENTER
button.
If you press the
ENTER
button again, the ( ) symbol
next to the channel disappears and the channel lock is
cancelled.
A blue screen is displayed when "Child Lock" is activated.
9. Press the EXIT button to exit.
Select "On" or "Off" in "Child Lock" to easily turn the channels which selected on " " to be active
or inactive.
You can select these options by simply pressing the CH LIST
button on the remote control
P 1 C3
Channel List
Move Enter
Page Return
Add Lock
1 / 10
Prog.
0 C--
1 C3
2 BBC 1
3 C74
4 C75
5 C76
6 S3
7 S4
8 S6
9 S7
Channel
Country :
United Kingdom
Auto Store
Manual Store
Channel Manager
Sort
Name
Fine Tune
Move Enter Return
TV
TV
Channel Manager
Channel List
Child Lock : Off
Move Enter Return
BN68-01410A-00Eng-0220.indd 12 2008-02-20 �� 11:31:08
English - 13
Sorting the Stored Channels
This operation allows you to change the programme numbers
of the stored channels.
This operation may be necessary after using the auto store.
1. Press the MENU button to display the menu.
Press the ▲ or ▼ button to select "Channel", then press the
ENTER
button.
2. Press the ▲ or ▼ button to select "Sort", then press the
ENTER
button.
3. Select the channel number that you wish to change by
pressing the ▲ or ▼ button repeatedly.
Press the
ENTER
button.
The selected channel number and name are moved to right
side.
4. Press the ▲ or ▼ button to move to the position in which you
would like to change and then press the
ENTER
button.
The selected channel is exchanged with the one
previously stored to the chosen number.
5. Repeat steps 3 to 4 for another channel to be sorted.
6. Press the EXIT button to exit.
Assigning Channels Names
Channel names will be assigned automatically when channel
information is broadcast. These names can be changed,
allowing you to assign new names.
1. Press the MENU button to display the menu.
Press the ▲ or ▼ button to select "Channel", then press the
ENTER
button.
2. Press the ▲ or ▼ button to select "Name", then press the
ENTER
button.
3. If necessary, select the channel to be assigned to a new
name by pressing the ▲ or ▼ button. Press the
ENTER
button
The selection bar is displayed around the name box.
4.
To... Then...
Select a letter, number or symbol Press the ▲ or ▼ button
Move on the next letter Press the ► button
Move back the previous letter Press the ◄ button
Conrm the name
Press the
ENTER
button
The following characters are available: Letters of the alphabet (A~Z) / Numbers (0~9) / Special
characters (+, -, *, /, space)
5. Repeat steps 3 to 4 for each channel to be assigned to a new name.
6. Press the EXIT button to exit.
Sort
Prog. Ch. Name
0 C--
1 C23
2 C16
3 C3
4 S1
s
TV
Move Enter Return
Channel
Country :
United Kingdom
Auto Store
Manual Store
Channel Manager
Sort
Name
Fine Tune
TV
Move Enter Return
Name
Move Enter Return
Prog. Ch. Name
0 C-- -----
1 C23 -----
2 C16 -----
3 C3 -----
4 S1 -----
s
TV
Channel
Country :
United Kingdom
Auto Store
Manual Store
Channel Manager
Sort
Name
Fine Tune
Move Enter Return
TV
BN68-01410A-00Eng-0220.indd 13 2008-02-20 �� 11:31:09
English - 14
Fine Tuning Channel Reception
Use fine tuning to manually adjust a particular channel for
optimal reception.
1. Use the number buttons to directly select the channel that
you want to ne tune.
2. Press the MENU button to display the menu.
Press the ▲ or ▼ button to select "Channel", then press the
ENTER
button.
3. Press the ▲ or ▼ button to select "Fine Tune", then press
the
ENTER
button.
4. Press the ◄ or ► button to adjust the ne tuning.
Press the
ENTER
button.
5. Press the EXIT button to exit.
Fine tuned channels that have been saved are marked with
an asterisk "*" on the right-hand side of the channel number
in the channel banner. And the channel number turns red.
To reset the ne-tuning, select "Reset" by pressing the ▲ or ▼
button and then press the
ENTER
button.
Channel
Country :
United Kingdom
Auto Store
Manual Store
Channel Manager
Sort
Name
Fine Tune
TV
Move Enter Return
Fine Tune
P 1
0
Reset
Adjust Save Return
BN68-01410A-00Eng-0220.indd 14 2008-02-20 �� 11:31:10
English - 15
Changing the Picture Standard
You can select the type of picture which best corresponds to
your viewing requirements.
1. Press the MENU button to display the menu.
Press the
ENTER
button, to select "Picture".
2. Press the
ENTER
button again, to select "Mode".
3. Press the ▲ or ▼ button to select the desired picture effect.
Press the
ENTER
button.
4. Press the EXIT button to exit.
Dynamic: Selects the picture for high-definition in a bright
room.
Standard: Selects the picture for optimum display in a
normal environment.
Movie: Selects the picture for comfortable display in a dark
room.
The Picture mode must be adjusted separately for each input
source.
You can also press the P.MODE button on the remote control to
select one of the picture settings.
Easy Setting
1. Press the TOOLS button on the remote control.
2. Press the ▲ or ▼ button to select “Picture Mode”.
3. Press the ◄ or ► button to select the desired picture mode.
4. Press the EXIT or TOOLS button to exit.
Picture
Mode : Standard
Backlight 7
Contrast 95
Brightness 45
Sharpness 50
Colour 50
Tint G50 R50
Detailed Settings
sMore
TV
Move Enter Return
Dynamic
Standard
Movie
Picture
Mode : Standard
Backlight 7
Contrast 95
Brightness 45
Sharpness 50
Colour 50
Tint G50 R50
Detailed Settings
sMore
TV
Move Enter Return
Tools
Anynet+ (HDMI-CEC)
Picture Mode Standard
Sound Mode : Custom
Sleep Timer : Off
SRS TS XT : Off
Energy Saving : Off
Dual l-ll : Mono
Move Adjust Exit
BN68-01410A-00Eng-0220.indd 15 2008-02-20 �� 11:31:11
English - 20
Viewing the Picture In Picture (PIP)
You can display a sub picture within the main picture of set
programme or video input. In this way, you can watch the
picture of set programme or video input from any connected
equipment while watching the main picture.
1. Press the MENU button to display the menu.
Press the ▲ or ▼ button to select "Setup", then press the
ENTER
button.
2. Press the▲ or ▼ button to select "PIP", then press the
ENTER
button.
3. Select the required option by pressing the ▲ or ▼ button, then
press the
ENTER
button.
4. When you are satisfied with your setting, press the
ENTER
button.
5. Press the EXIT button to exit.
You may notice that the picture in the PIP window becomes
slightly unnatural when you use the main screen to view a game
or karaoke.
Easy Setting
1. Press the TOOLS button on the remote control.
2. Press the ▲ or ▼ button to select “PIP”, then press the
ENTER
button.
3. Press the ▲ or ▼ button to select a particular item.
4. Press the ◄ or ► button to select the required option.
5. Press the EXIT or TOOLS button to exit.
PIP: On/Off
You can activate or deactivate the PIP function.
Main picture Sub picture
Component TV, Ext.1, Ext.2, AV
HDMI 1, 2, 3 TV, Ext.1, Ext.2, AV
PC TV, Ext.1, Ext.2, AV
Source
You can select a source of the sub-picture.
Size: / /
You can select a size of the sub-picture.
If main picture is in "HDMI" mode, "Size" is available.
Position: / / /
You can select a position of the sub-picture.
In Double ( , ) mode, "Position" cannot be selected.
Programme
You can select a channel of the sub-picture only when the "Source" is set to "TV".
Tools
Anynet+ (HDMI-CEC)
Picture Mode : Standard
Sound Mode : Custom
Sleep Timer : Off
SRS TS XT : Off
Energy Saving : Off
PIP
Move Enter Exit
TV
Setup
Plug & Play
Language : English
Time
Light Effect :
In Watching TV
Auto Wall-Mount
Melody : Off
Entertainment : Off
Energy Saving : Off
PIP
Move Enter Return
Mode : Custom
Equalizer
SRS TS XT : Off
Auto Volume : Off
Internal Mute : Off
Reset
Move Enter Return
TV
PIP
PIP : On
Source : TV
Size :
Position :
Programme : P 1
Move Enter Return
PIP
PIP : On
Source : TV
Programme : P 1
Size :
Position :
Move Adjust Return
BN68-01410A-00Eng-0220.indd 20 2008-02-20 �� 11:31:15
English - 21
Sound Features
1. Press the MENU button to display the menu. Press the ▲ or ▼
button to select "Sound", then press the
ENTER
button.
2. Select the required option by pressing the ▲ or ▼ button, then
press the
ENTER
button.
3. When you are satised with your setting, press the
ENTER
button.
4. Press the EXIT button to exit.
Mode: Standard/Music/Movie/Speech/Custom
You can select the type of special sound effect to be used when
watching a given broadcast.
Easy Setting
1. Press the TOOLS button on the remote control.
2. Press the ▲ or ▼ button to select "Sound Mode".
3. Press the ◄ or ► button to select the desired sound mode.
4. Press the EXIT or TOOLS button to exit.
Equalizer: Balance/100Hz/300Hz/1kHz/3kHz/10kHz
The sound settings can be adjusted to suit your personal
preferences.
If you make any changes to these settings, the sound mode
is automatically switched to "Custom".
SRS TS XT: Off/On
TruSurround XT is a patented SRS technology that solves the problem of playing 5.1 multichannel
content over two speakers. TruSurround delivers a compelling, virtual surround sound experience
through any two-speaker playback system, including internal television speakers. It is fully compatible
with all multichannel formats.
Easy Setting
1. Press the TOOLS button on the remote control.
2. Press the ▲ or ▼ button to select “SRS TS XT”.
3. Press the ◄ or ► button to select the "Off" or "On".
4. Press the EXIT or TOOLS button to exit.
TruSurround XT, SRS and Symbol are trademarks of SRS Labs, Inc.
TruSurround XT technology is incorporated under license from SRS Labs,
Inc.
Auto Volume: Off/On
Each broadcasting station has its own signal conditions, and so it is not easy to adjust the volume
every time the channel is changed. This feature lets you automatically adjust the volume of the
desired channel by lowering the sound output when the modulation signal is high or by raising the
sound output when the modulation signal is low.
TV
Sound
Mode : Custom
Equalizer
SRS TS XT : Off
Auto Volume : Off
TV Speaker : On
Sound Select : Main
Move Enter Return
Equalizer
Balance 100Hz 300Hz 1kHz 3kHz 10kHz
Move Adjust Return
TV
R
L
TV
Tools
Anynet+ (HDMI-CEC)
Picture Mode : Standard
Sound Mode Custom
Sleep Timer : Off
SRS TS XT : Off
Energy Saving : Off
Dual l-ll : Mono
Move Adjust Exit
Tools
Anynet+ (HDMI-CEC)
Picture Mode : Standard
Sound Mode : Custom
Sleep Timer : Off
SRS TS XT Off
Energy Saving : Off
Dual l-ll : Mono
Move Adjust Exit
BN68-01410A-00Eng-0220.indd 21 2008-02-20 �� 11:31:16
English - 23
Setting and Displaying the Current Time
You can set the TV’s clock so that the current time is
displayed when you press the INFO button. You must also set
the time if you wish to use the automatic On/Off timers.
1. Press the MENU button to display the menu.
Press the ▲ or ▼ button to select "Setup", then press the
ENTER
button.
2. Press the ▲ or ▼ button to select "Time", then press the
ENTER
button.
3. Press the
ENTER
button to select "Clock Set".
4.
5. Press the EXIT button to exit.
The current time will appear every time you press the INFO button.
You can also set "Year", "Month", "Day", "Hour" and "Minute" by pressing the number buttons on the
remote control.
To... Press the....
Move to "Month", "Day", "Year", "Hour"
or "Minute"
◄ or ► button.
Set the "Month", "Day", "Year", "Hour"
or "Minute"
▲ or ▼ button.
Conrm the setting
ENTER
button
Setting the Sleep Timer
You can select a time period of between 30 and 180 minutes
after which the television automatically switches to standby
mode.
1. Press the MENU button to display the menu.
Press the ▲ or ▼ button to select "Setup", then press the
ENTER
button.
2. Press the ▲ or ▼ button to select "Time", then press the
ENTER
button.
3. Press the ▲ or ▼ button to select "Sleep Timer", then press
the
ENTER
button.
4. Press the ▲ or ▼ button repeatedly until the desired time
appears (Off, 30, 60, 90, 120, 150, 180).
Press the
ENTER
button.
5. Press the EXIT button to exit.
The TV automatically switches to standby mode when the
timer reaches 0.
Easy Setting
1. Press the TOOLS button on the remote control.
2. Press the ▲ or ▼ button to select “Sleep Timer”.
3. Press the ◄ or ► button to select the minute.
4. Press the EXIT or TOOLS button to exit.
Tools
Anynet+ (HDMI-CEC)
Picture Mode : Standard
Sound Mode : Custom
Sleep Timer Off
SRS TS XT : Off
Energy Saving : Off
Dual l-ll : Mono
Move Adjust Exit
Mode : Custom
Equalizer
SRS TS XT : Off
Auto Volume : Off
Internal Mute : Off
Reset
Move Enter Return
TV
Setup
Plug & Play
Language : English
Time
Light Effect :
In Watching TV
Auto Wall-Mount
Melody : Off
Entertainment : Off
Energy Saving : Off
PIP
Move Enter Return
TV
Clock Set
Month
01
Day
p
q
01
2008
Year
00
Hour
00
Minute
Move Adjust Return
Mode : Custom
Equalizer
SRS TS XT : Off
Auto Volume : Off
Internal Mute : Off
Reset
Move Enter Return
TV
Setup
Plug & Play
Language : English
Time
Light Effect :
In Watching TV
Auto Wall-Mount
Melody : Off
Entertainment : Off
Energy Saving : Off
PIP
Move Enter Return
Time
Clock Set : 00:00
Sleep Timer :
Timer 1 :
Timer 2 :
Timer 3 :
Move Enter Return
TV
Off
30
60
90
120
150
180
BN68-01410A-00Eng-0220.indd 23 2008-02-20 �� 11:31:18
English - 24
Switching the Television On and Off Automatically
1. Press the MENU button to display the menu.
Press the ▲ or ▼ button to select "Setup", then press the
ENTER
button.
2. Press the ▲ or ▼ button to select "Time", then press the
ENTER
button.
3. Press the ▲ or ▼ button to select "Timer 1", "Timer 2",
"Timer 3", then press the
ENTER
button.
Three different On/Off Timer Settings can be made.
You must set the clock first.
4. Press the ◄ or ► button to select the required item below.
Press the ▲ or ▼ button to adjust to the setting satised.
On Time : Select hour, minute and "Activate"/"Inactivate".
(To activate timer with the setting satised, set to "Activate".)
Off Time : Select hour, minute and "Activate"/"Inactivate".
(To activate timer with the setting satised, set to "Activate".)
Volume : Select the desired turn on volume level.
Repeat : Select "Once", "Everyday", "Mon~Fri", "Mon~Sat" or "Sat~Sun".
Programme : When the On Timer is active, you can turn on a specic channel.
You can set the hour and minute directly by pressing the number buttons on the remote control.
Auto Power Off
When you set the timer On, the TV will eventually turn off, if no controls are operated for 3 hours
after the TV was turned on by timer. This function is only available in timer On mode and prevents
overheating, which may occur if a TV is on for too long time.
Choosing Your Language
When you start using your set for the first time, you must
select the language which will be used for displaying menus
and indications.
1. Press the MENU button to display the on-screen menu.
Press the ▲ or ▼ button to select "Setup", then press the
ENTER
button.
2. Press the ▲ or ▼ button to select "Language", then press
the
ENTER
button.
3. Select a particular language by pressing the ▲ or ▼ button
repeatedly.
Press the
ENTER
button.
4. Press the EXIT button to exit.
TV
Setup
Plug & Play
Language : English
Time
Light Effect :
In Watching TV
Auto Wall-Mount
Melody : Off
Entertainment : Off
Energy Saving : Off
PIP
Move Enter Return
TV
Setup
Plug & Play
Language : English
Time
Light Effect :
In Watching TV
Auto Wall-Mount
Melody : Off
Entertainment : Off
Energy Saving : Off
PIP
Move Enter Return
TV
Timer 1
On Time
Repeat
Once
00
5
6
:
Off Time
00
:
Move Adjust Return
Inactivate
Inactivate
10
Volume
00
00
1
Programme
BN68-01410A-00Eng-0220.indd 24 2008-02-20 �� 11:31:19
English - 28
Display Modes
Both screen position and size will vary depending on the type of PC monitor and its resolution.
The resolutions in the table are recommended.
D-Sub Input
Mode Resolution
Horizontal
Frequency (kHz)
Vertical
Frequency (Hz)
Pixel Clock
Frequency (MHz)
Sync Polarity
(H/V)
IBM
640 x 350
720 x 400
31.469
31.469
70.086
70.087
25.175
28.322
+ / -
- / +
VESA
640 x 480
640 x 480
640 x 480
800 x 600
800 x 600
800 x 600
1024 x 768
1024 x 768
1024 x 768
1280 x 1024
1280 x 1024
1360 x 768
1600 x 1200
31.469
37.861
37.500
37.879
48.077
46.875
48.363
56.476
60.023
63.981
79.976
47.712
75.000
59.940
72.809
75.000
60.317
72.188
75.000
60.004
70.069
75.029
60.020
75.025
60.015
60.000
25.175
31.500
31.500
40.000
50.000
49.500
65.000
75.000
78.750
108.000
135.000
85.500
162.000
- / -
- / -
- / -
+ / +
+ / +
+ / +
- / -
- / -
+ / +
+ / +
+ / +
+ / +
+ / +
CVT 1920 x 1080RB 66.587 59.934 138.500 + / -
HDMI/DVI Input
Mode Resolution
Horizontal
Frequency (kHz)
Vertical
Frequency (Hz)
Pixel Clock
Frequency (MHz)
Sync Polarity
(H/V)
VESA
640 x 480
800 x 600
1024 x 768
1280 x 1024
1360 x 768
1600 x 1200
31.469
37.879
48.363
63.981
47.712
75.000
59.940
60.317
60.004
60.020
60.015
60.000
25.175
40.000
65.000
108.000
85.500
162.000
- / -
+ / +
- / -
+ / +
+ / +
+ / +
CEA 1920 x 1080p 67.500 60.000 148.500 + / +
When using an HDMI/DVI cable connection, you must use the HDMI IN 2 jack.
The interlace mode is not supported.
The set might operate abnormally if a non-standard video format is selected.
Separate and Composite modes are supported. SOG is not supported.
Too long or low quality VGA cable can cause picture noise at high resolution modes
(1920x1080 or 1600x1200).
Setting up Your PC Software (Based on Windows XP)
The Windows display-settings for a typical computer are shown below. The
actual screens on your PC may be different depending upon your particular
version of Windows and your particular video card. Even if your actual screens
look different, the same, basic set-up information will apply in almost all cases.
(If not, contact your computer manufacturer or Samsung Dealer.)
1. First, click on "Control Panel" on the Windows start menu.
2. When the control panel window appears, click on "Appearance and Themes"
and a display dialog-box will appear.
3. When the control panel window appears, click on "Display" and a display
dialog-box will appear.
4. Navigate to the "Settings" tab on the display dialog-box.
The correct size setting (resolution): Optimum- 1920 X 1080
If a vertical-frequency option exists on your display settings dialog box, the correct value is
"60" or "60 Hz". Otherwise, just click "OK" and exit the dialog box.
BN68-01410A-00Eng-0220.indd 28 2008-02-20 �� 11:31:22
English - 29
Setting up the TV with your PC
Press the SOURCE button to select PC mode.
1. Press the MENU button to display the menu.
Press the ENTER button, to select "Picture".
2. Select the required option by pressing the ▲ or ▼ button,
then press the ENTER button.
3. When you are satised with your setting, press the ENTER
button.
4. Press the EXIT button to exit.
Auto Adjustment
Auto adjustment allows the PC screen of set to self-adjust to
the incoming PC video signal. The values of fine, coarse and
position are adjusted automatically.
Easy Setting
1. Press the TOOLS button on the remote control.
2. Press the ▲ or ▼ button to select “Auto Adjustment”, then
press the ENTER button.
Screen:
Coarse/Fine
The purpose of picture quality adjustment is to remove or reduce
picture noise. If the noise is not removed by Fine-tuning alone,
then adjust the frequency as best as possible (coarse) and Fine-
tune again. After the noise has been reduced,
readjust the picture so that it is aligned on the center of screen.
Press the ▲ or ▼ button to select "Coarse" or "Fine", then press
the ENTER button.
Press the ◄ or ► button to adjust the screen quality.
Press the ENTER button.
Position
Adjust the PC’s screen positioning if it does not fit the TV screen.
Press the ▲ or ▼ button to adjusting the Vertical-Position.
Press the ◄ or ► button to adjust the Horizontal-Position.
Press the ENTER button.
Image Reset
You can replace all image settings with the factory default
values.
Auto Adjustment in progress
Please wait.
TV
Screen
Coarse 50
Fine 93
Position
Image Reset
Move Enter Return
Picture
Mode : Standard
Backlight 7
Contrast 95
Brightness 45
Sharpness 50
Auto Adjustment
Screen
Detailed Settings
sMore
TV
Move Enter Return
TV
Position
Move Enter Return
TV
Screen
Coarse 50
Fine 93
Position
Image Reset
Move Enter Return
Tools
Anynet+ (HDMI-CEC)
Picture Mode : Standard
Sound Mode : Custom
Sleep Timer : Off
SRS TS XT : Off
Energy Saving : Off
PIP
Auto Adjustment
Move Enter Exit
BN68-01410A-00Eng-0220.indd 29 2008-02-20 �� 11:31:24
English - 31
Using the WISELINK Menu
1. Press the MENU button. Press the ▲ or ▼ button to select
“Input”, then press the ENTER button.
2. Press the ▲ or ▼ button to select “WISELINK”, then press the
ENTER button.
3. Press the ▲ or ▼ button to select the corresponding USB
Memory Device, then press the ENTER button.
The "WISELINK" menu differs depending on the USB
Memory Device connected to TV.
Some devices may not be supported due to compatibility
problems.
4. Press the ◄ or ► button to move to an icon, then press the
ENTER button.
To exit WISELINK mode, press the W.LINK button on the
remote control.
Press the W.LINK button on the remote control to display a
WISELINK menu.
Using the Remote Control Button in WISELINK Menu
Button Operations
▲/ ▼/ ◄/ ► Move the cursor and select an item.
ENTER
Select the currently selected item.
Play the Slide Show or MP3 file.
Pause the Slide Show or MP3 file.
RETURN Return to the previous menu.
INFO Run various functions from the Photo and Music menus.
Stop the current slide show or MP3 file.
Page Up or Down (file list item)
EXIT Stop the current function and return to the previous high-level menu.
Input
Source List : TV
Edit Name
Anynet+ (HDMI-CEC)
WISELINK
TV
Move Enter Return
Move Enter Exit
SUM
STORAGE DEVICE
STORAGE DEVICE
STORAGE DEVICE
STORAGE DEVICE
Move Enter Return
SUM
861MB/994MBFree
Photo
Photo Music Setup
BN68-01410A-00Eng-0220.indd 31 2008-02-20 �� 11:31:36
English - 32
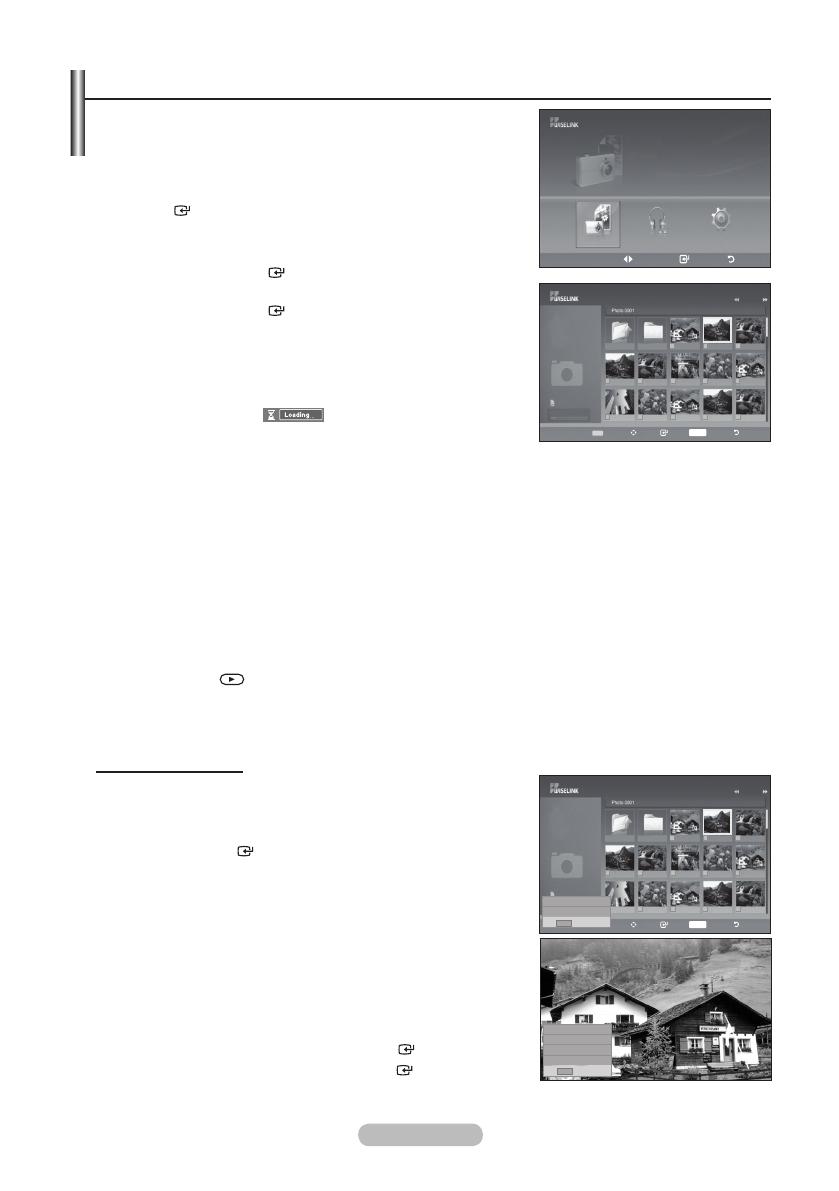
Using the PHOTO (JPEG) List
This menu shows JPEG les and folders saved on an USB memory
device.
1. Complete Steps 1 to 3 of “Using the WISELINK Menu”.
(Refer to page 31)
2. Press the ◄ or ► button to move to “Photo”, then press the
ENTER button. The saved le information is displayed as a
folder or le.
3. Press the ▲, ▼, ◄ and ► buttons to select a le.
Pressing the ENTER button over a photo icon shows the
currently selected photo in full screen.
Pressing the ENTER button over a folder icon shows the
JPEG les included in the folder.
To exit WISELINK mode, press the W.LINK button on the
remote control.
Moving to a photo may take a few seconds to load the le.
At this point, the icon will appear at the top left
of the screen.
It takes time to show JPEG les as Thumbnail images.
This menu only shows les whose le extension is jpg. Files of other formats such as bmp or tiff
will not be displayed.
The les are displayed on a page. 15 thumbnail photos are displayed per page.
The thumbnails are numbered from left to right and from top to bottom, from 1 to 15.
Certain types of USB Digital camera and audio devices may not be compatible with this TV.
Folders are displayed rst and they are followed by all JPEG les in the current folder. The
folders and JPEG les are sorted in alphabetical order.
If the photo is displayed in full screen, you can zoom in and out or rotate the photo on the screen.
While a full screen is displayed, ◄ or ► button will let you see another photo image in the same
folder.
Press the button when a Photo icon is selected to start a Slide Show.
Photos without EXIF information may not be displayed as thumbnail images in the PHOTO LIST
depending on the picture quality and resolution.
Viewing a Slide Show
4. Press the INFO button to display the option("Start Slide Show",
"Select All").
5. Press the ▲ or ▼ button to select “Start Slide Show” then
press the ENTER button.
During the slide show, les are displayed in order from the
currently shown le.
MP3 les can be automatically played during the Slide
Show if the Default Background Music is set to On. To
enable this function, MP3 les and other photo les must
be located in the same folder on the USB Memory Device.
6. Press the INFO button during the slide show to set the
following options ("Slide Show Speed", "Background Music",
"Background Music Setting", "List"). Press the ▲ or ▼ button
to select the option, then press the ENTER button.
After setting the option press the ENTER button to make a
change.
Upper Folder
Forder1
Photo 0001 Photo 0001 None
File 4 File 5 File 6 File 7 File 8
File 9 File 10 File 11 File 12 File 13
Select Move Enter
INFO
Option Return
Photo
1/10 Page
580*440
47KB
Jun 1,2008
3/23
895MB/993MB
SUM
Upper Folder
Forder1
Photo 0001 Photo 0001 None
File 4 File 5 File 6 File 7 File 8
File 9 File 10 File 11 File 12 File 13
Select Move Enter
INFO
Option Return
Photo
1/10 Page
580*440
47KB
Jun 1,2008
3/23
895MB/993MB
Start Slide Show
Select All
INFO
Exit
Slide Show Speed Nomal
Background Music
On
Background Music Setting
List
INFO
Exit
Move Enter Return
SUM
861MB/994MBFree
Photo
Photo Music Setup
BN68-01410A-00Eng-0220.indd 32 2008-02-20 �� 11:31:46
English - 33
Using the Menu during a Slide Show
Slide Show Speed:
Select to control the slide show speed.
Press the ▲ or ▼ button to select the required option
("Fast", "Normal", "Slow"), then press the ENTER button.
Background Music:
Select to choose whether you want to play an MP3 le during a
slide show.
Press the ▲ or ▼ button to select the required option("On", "Off"),
then press the ENTER button.
Background Music Setting:
While the slide show is in progress, MP3 les and folders under the
same directory are displayed.
Select a folder using the ▲ or ▼ button and press the ENTER
button. The selected folder will be highlighted. Press the RETURN
button again to return to the slide show screen. The selected
background music is played.
If you turn Off the Background Music, even if the Background
Music Settings have been set up, the background music will
not be played.
List:
The le information is displayed as a folder or JPEG le.
To exit WISELINK mode, press the W.LINK button on the remote
control.
When selecting a photo le, the photo le information is
displayed on the left side of the TV screen, such as the
resolution, the date modied and the order of the le in the
current directory (e.g. 10th out of 15).
: Folder icon
: Photo icon
: Move to the previous
folder stage icon
Upper Folder
01-001
02-002
03-003
04-004
05-005
Select
Move Enter Return
◄◄ 1/1 Page ►►
Background Music Setting
Choose file for background music
Upper Folder
Forder1
Photo 0001 Photo 0001 None
File 4 File 5 File 6 File 7 File 8
File 9 File 10 File 11 File 12 File 13
Select Move Enter
INFO
Option Return
Photo
1/10 Page
580*440
47KB
Jun 1,2008
3/23
895MB/993MB
SUM
Upper Folder
Forder1
Photo 0001 Photo 0001 None
File 4 File 5 File 6 File 7 File 8
File 9 File 10 File 11 File 12 File 13
Select Move Enter
INFO
Option Return
Photo
1/10 Page
580*440
47KB
Jun 1,2008
3/23
895MB/993MB
SUM
Photo
580*440
47KB
Jun 1,2008
3/23
Such as the resolution
Order of the file in the
current directory
Date modified
File Size
Slide Show Speed Nomal
Background Music
On
Background Music Setting
List
INFO
Exit
Fast
Nomal
Slow
Slide Show Speed Nomal
Background Music
On
Background Music Setting
List
INFO
Exit
Off
On
BN68-01410A-00Eng-0220.indd 33 2008-02-20 �� 11:31:48
English - 35
Using the MP3 List
This menu shows MP3 les from among the les saved on a USB
memory device.
1. Complete Steps 1 to 3 of “Using the WISELINK Menu”.
(Refer to page 31)
2. Press the ◄ or ► button to move to “Music”, then press the
ENTER button. The saved le information is displayed as a
folder or le.
3. Press the ▲ or ▼ button to move to an icon, then press the
ENTER button.
Pressing the ENTER button over a musical note icon
immediately plays the music le.
Pressing the ENTER button over a folder icon shows the
music les included in the folder.
To select a le on the next page, press the or button
to move to the next page.
4. To select all les or a le, press the INFO button to display the
Music menus. Press the ENTER button to select “Play”,
“Repeat Music” or “Select All”.
To exit WISELINK mode, press the W.LINK button on the remote
control.
Using the Option Menu
Play:
Select to play MP3 files.
Press the button while playing an MP3 le to pause the le.
Press the button to exit Play mode.
This menu only shows les with the MP3 le extension. Files with other le extensions are not
displayed,even if they are saved on the same USB device.
The selected le is displayed on the top with its playing time.
To adjust the music volume, press the VOL +, VOL - button on the remote control. To mute the
sound, press the MUTE button on the remote control.
Repeat Music:
Select to repeatedly play MP3 les in the current folder.
You can select On or Off.
Music function information icon
: When all music les are being played.
: When a music le is being played.
/
:
When pressing the
/
button on the remote control while music is playing.
: When pressing the button on the remote control when music is stopped.
: Folder icon
: Music icon
: Move to the previous
folder stage icon
Move Enter Return
SUM
861MB/994MBFree
Music
Photo Music Setup
Upper Folder
00:04:01
00:04:28
00:04:12
00:05:39
00:04:30
00:04:30
00:03:54
00:05:25
Folder 1
001-001
002-002
003-003
004-004
005-005
007-007
008-008
006-006
006-006
00:04:00
Select Move Enter
INFO
Option Return
Music
1/10 Page
5MB
Jun 1,2008
3/23
Play
Repeat Music Off
Select All
INFO
Exit
BN68-01410A-00Eng-0220.indd 35 2008-02-20 �� 11:32:06
English - 36
Using the Setup Menu
Setup displays the user settings of the WISELINK menu.
1. Complete Steps 1 to 3 of “Using the WISELINK Menu”.
(Refer to page 31)
2. Press the ◄ or ► button to move to “Setup”, then press the ENTER button.
3. Press the ▲ or ▼ button to select an item you want, then press the ENTER button. (“Slide Show
Speed”, “Background Music”, “Background Music Setting”, “Repeat Music”, “Screen Saver”)
4. Press the ▲ or ▼ button to select the option, then press the ENTER button.
To exit WISELINK mode, press the W.LINK button on the remote control.
Slide Show Speed:
Select to control the slide show speed. You can select “Fast”,
“Normal” or “Slow”.
Background Music :
Select to determine whether to play an MP3 file during a slide show.
You can select Music “On” or Music “Off”.
Background Music Setting:
While a slide show is in progress, use the "Background Music
Setup" to select a music file to listen to. Select an MP3 file as the
background music.
Repeat Music :
Select to determine whether to repeat playing the music when all
MP3 files in the current folder have been played.
Screen Saver:
Select to set the waiting time before the screen saver appears.
The screensaver will appear when no button is pressed for 1, 5 or
10 minutes.
Slide Show Speed Normal
Background Music On
Background Music Setting
Repeat Music Off
Screen Saver 1min.
Move Enter Return
Setup
Fast
Normal
Slow
Upper Folder
01-001
02-002
03-003
04-004
05-005
Select
Move Enter Return
◄◄ 1/1 Page ►►
Background Music Setting
Choose file for background music
Slide Show Speed Normal
Background Music On
Background Music Setting
Repeat Music Off
Screen Saver 1min.
Move Enter Return
Setup
Off
On
Slide Show Speed Normal
Background Music On
Background Music Setting
Repeat Music Off
Screen Saver 1min.
Move Enter Return
Setup
1min.
5min.
10min.
Slide Show Speed Normal
Background Music On
Background Music Setting
Repeat Music Off
Screen Saver 1min.
Move Enter Return
Setup
Off
On
BN68-01410A-00Eng-0220.indd 36 2008-02-20 �� 11:32:18
English - 37
What is Anynet+?
Anynet+ is an AV network system that enables an easy-to-use AV interface for users by controlling
all connected AV devices through the Anynet+ menu when Samsung Electronics AV devices are
connected.
Connecting Anynet+ Devices
The Anynet+ system supports AV devices supporting Anynet+ only.
Check if there is an Anynet+ mark on the AV device to be connected to the TV.
To directly connect to TV
Connect the [HDMI 1],
[HDMI 2] or [HDMI 3] jack on
the TV and the HDMI OUT jack
of the corresponding Anynet+
device using the HDMI cable.
To connect to Home Theater
1. Connect the [HDMI 1],
[HDMI 2] or [HDMI 3]
jack on the TV and the
HDMI OUT jack of the
corresponding Anynet+
device using the HDMI
cable.
2. Connect the HDMI IN jack
of the home theatre and
the HDMI OUT jack of the
corresponding Anynet+
device using the HDMI
cable.
Connect only one receiver.
You can connect an Anynet+ device using the HDMI 1.3 cable. Some HDMI cables may not support
Anynet+ functions.
Anynet+ works when the AV device supporting Anynet+ is in the Standby or On status.
Anynet+ supports up to 8 AV devices in total.
SER
S
E
R
TV
Anynet+ Device 1 Anynet+ Device 2
Anynet+ Device 3
HDMI 1.3 Cable
HDMI 1.3 Cable
HDMI 1.3 Cable
HDMI 1.3 Cable
Home Theatre
Anynet+ Device 1 Anynet+ Device 2 Anynet+ Device 3
SER
S
E
R
TV
HDMI 1.3 Cable
HDMI 1.3 Cable
HDMI 1.3 Cable
BN68-01410A-00Eng-0220.indd 37 2008-02-20 �� 11:32:19
English - 38
Setting Up Anynet+
The following settings are to use Anynet+ functions.
Using the Anynet+ Function
1. Press The TOOLS button. Then Press the ENTER button to
select "Anynet+(HDMI-CEC)".
Press the ▲ or ▼ button to select "Setup", then press the
ENTER button.
2. Press the ENTER button to select "Anynet+ (HDMI-CEC)",
then press the ENTER button.
3. Press the ▲ or ▼ button to select "On", then press the
ENTER button.
The "Anynet+ (HDMI-CEC)" function is enabled.
If you select "Off", "Anynet+ (HDMI-CEC)" is disabled.
When the "Anynet+ (HDMI-CEC)" function is disabled, all the
Anynet+ related operations are deactivated.
Turning an Anynet+ Device Off Automatically when the TV is Turned Off
1. Press the ▲ or ▼ button to select "Auto Turn Off", then press
the ENTER button.
2. Press the ▲ or ▼ button to select "Yes", then press the
ENTER button.
The Auto turn off function is enabled.
If you select "No", the Auto turn off function is cancelled.
Press the EXIT button to exit.
The Select Device setting of the TV remote control is to be set
to TV to use the Anynet+ function.
If you set "Auto Turn Off" to "No", connected external devices are also turned off when the TV is
turned off. However, if the device is recording, it may not be turned off.
Setup
Anynet+ (HDMI-CEC)
: Off
Auto Turn Off
: Off
Searching Connections
Off
On
Move Enter Return
Setup
Anynet+ (HDMI-CEC)
: On
Auto Turn Off
: Off
Searching Connections
No
Yes
Move Enter Return
View TV
Select Device
Record
Menu on Device
Device Operation
Receiver :Off
Setup
TV P9
Move Enter
Return
Tools
Anynet+ (HDMI-CEC)
Picture Mode : Standard
Sound Mode : Custom
Sleep Timer : Off
SRS TS XT : Off
Energy Saving : Off
Dual l-ll : Mono
Move Enter Exit
BN68-01410A-00Eng-0220.indd 38 2008-02-20 �� 11:32:20
  • Page 1 1
  • Page 2 2
  • Page 3 3
  • Page 4 4
  • Page 5 5
  • Page 6 6
  • Page 7 7
  • Page 8 8
  • Page 9 9
  • Page 10 10
  • Page 11 11
  • Page 12 12
  • Page 13 13
  • Page 14 14
  • Page 15 15
  • Page 16 16
  • Page 17 17
  • Page 18 18
  • Page 19 19
  • Page 20 20
  • Page 21 21
  • Page 22 22
  • Page 23 23
  • Page 24 24
  • Page 25 25
  • Page 26 26
  • Page 27 27
  • Page 28 28
  • Page 29 29
  • Page 30 30
  • Page 31 31
  • Page 32 32
  • Page 33 33
  • Page 34 34
  • Page 35 35
  • Page 36 36
  • Page 37 37
  • Page 38 38
  • Page 39 39
  • Page 40 40
  • Page 41 41
  • Page 42 42
  • Page 43 43
  • Page 44 44
  • Page 45 45
  • Page 46 46
  • Page 47 47
  • Page 48 48
  • Page 49 49
  • Page 50 50
  • Page 51 51
  • Page 52 52
  • Page 53 53
  • Page 54 54
  • Page 55 55
  • Page 56 56
  • Page 57 57
  • Page 58 58
  • Page 59 59
  • Page 60 60
  • Page 61 61
  • Page 62 62
  • Page 63 63
  • Page 64 64
  • Page 65 65
  • Page 66 66
  • Page 67 67
  • Page 68 68
  • Page 69 69
  • Page 70 70
  • Page 71 71
  • Page 72 72
  • Page 73 73
  • Page 74 74
  • Page 75 75
  • Page 76 76
  • Page 77 77
  • Page 78 78
  • Page 79 79
  • Page 80 80
  • Page 81 81
  • Page 82 82
  • Page 83 83
  • Page 84 84
  • Page 85 85
  • Page 86 86
  • Page 87 87
  • Page 88 88
  • Page 89 89
  • Page 90 90
  • Page 91 91
  • Page 92 92
  • Page 93 93
  • Page 94 94
  • Page 95 95
  • Page 96 96
  • Page 97 97
  • Page 98 98
  • Page 99 99
  • Page 100 100
  • Page 101 101
  • Page 102 102
  • Page 103 103
  • Page 104 104
  • Page 105 105
  • Page 106 106
  • Page 107 107
  • Page 108 108
  • Page 109 109
  • Page 110 110
  • Page 111 111
  • Page 112 112
  • Page 113 113
  • Page 114 114
  • Page 115 115
  • Page 116 116
  • Page 117 117
  • Page 118 118
  • Page 119 119
  • Page 120 120
  • Page 121 121
  • Page 122 122
  • Page 123 123
  • Page 124 124
  • Page 125 125
  • Page 126 126
  • Page 127 127
  • Page 128 128
  • Page 129 129
  • Page 130 130
  • Page 131 131
  • Page 132 132
  • Page 133 133
  • Page 134 134
  • Page 135 135
  • Page 136 136
  • Page 137 137
  • Page 138 138
  • Page 139 139
  • Page 140 140
  • Page 141 141
  • Page 142 142
  • Page 143 143
  • Page 144 144
  • Page 145 145
  • Page 146 146
  • Page 147 147
  • Page 148 148
  • Page 149 149
  • Page 150 150
  • Page 151 151
  • Page 152 152
  • Page 153 153
  • Page 154 154
  • Page 155 155
  • Page 156 156
  • Page 157 157
  • Page 158 158
  • Page 159 159
  • Page 160 160
  • Page 161 161
  • Page 162 162
  • Page 163 163
  • Page 164 164
  • Page 165 165
  • Page 166 166
  • Page 167 167
  • Page 168 168
  • Page 169 169
  • Page 170 170
  • Page 171 171
  • Page 172 172
  • Page 173 173
  • Page 174 174
  • Page 175 175
  • Page 176 176
  • Page 177 177
  • Page 178 178
  • Page 179 179
  • Page 180 180
  • Page 181 181
  • Page 182 182
  • Page 183 183
  • Page 184 184
  • Page 185 185
  • Page 186 186
  • Page 187 187
  • Page 188 188
  • Page 189 189
  • Page 190 190
  • Page 191 191
  • Page 192 192
  • Page 193 193
  • Page 194 194
  • Page 195 195
  • Page 196 196
  • Page 197 197
  • Page 198 198
  • Page 199 199
  • Page 200 200
  • Page 201 201
  • Page 202 202
  • Page 203 203
  • Page 204 204
  • Page 205 205
  • Page 206 206
  • Page 207 207
  • Page 208 208
  • Page 209 209
  • Page 210 210
  • Page 211 211
  • Page 212 212
  • Page 213 213
  • Page 214 214
  • Page 215 215
  • Page 216 216
  • Page 217 217
  • Page 218 218
  • Page 219 219
  • Page 220 220
  • Page 221 221
  • Page 222 222
  • Page 223 223
  • Page 224 224
  • Page 225 225
  • Page 226 226
  • Page 227 227
  • Page 228 228
  • Page 229 229
  • Page 230 230
  • Page 231 231
  • Page 232 232
  • Page 233 233
  • Page 234 234
  • Page 235 235
  • Page 236 236
  • Page 237 237
  • Page 238 238
  • Page 239 239
  • Page 240 240
  • Page 241 241
  • Page 242 242
  • Page 243 243
  • Page 244 244
  • Page 245 245
  • Page 246 246
  • Page 247 247
  • Page 248 248
  • Page 249 249
  • Page 250 250
  • Page 251 251
  • Page 252 252
  • Page 253 253
  • Page 254 254
  • Page 255 255
  • Page 256 256
  • Page 257 257
  • Page 258 258
  • Page 259 259
  • Page 260 260
  • Page 261 261
  • Page 262 262
  • Page 263 263
  • Page 264 264
  • Page 265 265
  • Page 266 266
  • Page 267 267
  • Page 268 268
  • Page 269 269
  • Page 270 270
  • Page 271 271
  • Page 272 272
  • Page 273 273
  • Page 274 274
  • Page 275 275
  • Page 276 276
  • Page 277 277
  • Page 278 278
  • Page 279 279
  • Page 280 280
  • Page 281 281
  • Page 282 282
  • Page 283 283
  • Page 284 284
  • Page 285 285
  • Page 286 286
  • Page 287 287
  • Page 288 288
  • Page 289 289
  • Page 290 290
  • Page 291 291
  • Page 292 292
  • Page 293 293
  • Page 294 294
  • Page 295 295
  • Page 296 296
  • Page 297 297
  • Page 298 298
  • Page 299 299
  • Page 300 300
  • Page 301 301
  • Page 302 302
  • Page 303 303
  • Page 304 304
  • Page 305 305
  • Page 306 306
  • Page 307 307
  • Page 308 308
  • Page 309 309
  • Page 310 310
  • Page 311 311
  • Page 312 312
  • Page 313 313
  • Page 314 314
  • Page 315 315
  • Page 316 316
  • Page 317 317
  • Page 318 318
  • Page 319 319
  • Page 320 320
  • Page 321 321
  • Page 322 322
  • Page 323 323
  • Page 324 324
  • Page 325 325
  • Page 326 326
  • Page 327 327
  • Page 328 328
  • Page 329 329
  • Page 330 330
  • Page 331 331
  • Page 332 332
  • Page 333 333
  • Page 334 334
  • Page 335 335
  • Page 336 336
  • Page 337 337
  • Page 338 338
  • Page 339 339
  • Page 340 340
  • Page 341 341
  • Page 342 342
  • Page 343 343
  • Page 344 344
  • Page 345 345
  • Page 346 346
  • Page 347 347
  • Page 348 348
  • Page 349 349
  • Page 350 350
  • Page 351 351
  • Page 352 352
  • Page 353 353
  • Page 354 354
  • Page 355 355
  • Page 356 356
  • Page 357 357
  • Page 358 358
  • Page 359 359
  • Page 360 360
  • Page 361 361
  • Page 362 362
  • Page 363 363
  • Page 364 364
  • Page 365 365
  • Page 366 366
  • Page 367 367
  • Page 368 368
  • Page 369 369
  • Page 370 370
  • Page 371 371
  • Page 372 372
  • Page 373 373
  • Page 374 374
  • Page 375 375
  • Page 376 376
  • Page 377 377
  • Page 378 378
  • Page 379 379
  • Page 380 380
  • Page 381 381
  • Page 382 382
  • Page 383 383
  • Page 384 384
  • Page 385 385
  • Page 386 386
  • Page 387 387
  • Page 388 388
  • Page 389 389
  • Page 390 390
  • Page 391 391
  • Page 392 392
  • Page 393 393
  • Page 394 394
  • Page 395 395
  • Page 396 396
  • Page 397 397
  • Page 398 398
  • Page 399 399
  • Page 400 400
  • Page 401 401
  • Page 402 402
  • Page 403 403
  • Page 404 404
  • Page 405 405
  • Page 406 406
  • Page 407 407
  • Page 408 408
  • Page 409 409
  • Page 410 410
  • Page 411 411
  • Page 412 412
  • Page 413 413
  • Page 414 414
  • Page 415 415
  • Page 416 416
  • Page 417 417
  • Page 418 418
  • Page 419 419
  • Page 420 420
  • Page 421 421
  • Page 422 422
  • Page 423 423
  • Page 424 424
  • Page 425 425
  • Page 426 426
  • Page 427 427
  • Page 428 428
  • Page 429 429
  • Page 430 430
  • Page 431 431
  • Page 432 432
  • Page 433 433
  • Page 434 434
  • Page 435 435
  • Page 436 436
  • Page 437 437
  • Page 438 438
  • Page 439 439
  • Page 440 440
  • Page 441 441
  • Page 442 442
  • Page 443 443
  • Page 444 444
  • Page 445 445
  • Page 446 446
  • Page 447 447
  • Page 448 448
  • Page 449 449
  • Page 450 450
  • Page 451 451
  • Page 452 452
  • Page 453 453
  • Page 454 454
  • Page 455 455
  • Page 456 456
  • Page 457 457
  • Page 458 458
  • Page 459 459
  • Page 460 460
  • Page 461 461
  • Page 462 462
  • Page 463 463
  • Page 464 464
  • Page 465 465
  • Page 466 466
  • Page 467 467
  • Page 468 468
  • Page 469 469
  • Page 470 470
  • Page 471 471
  • Page 472 472
  • Page 473 473
  • Page 474 474
  • Page 475 475
  • Page 476 476
  • Page 477 477
  • Page 478 478
  • Page 479 479
  • Page 480 480
  • Page 481 481
  • Page 482 482
  • Page 483 483
  • Page 484 484
  • Page 485 485
  • Page 486 486
  • Page 487 487
  • Page 488 488
  • Page 489 489
  • Page 490 490
  • Page 491 491
  • Page 492 492
  • Page 493 493
  • Page 494 494
  • Page 495 495
  • Page 496 496
  • Page 497 497
  • Page 498 498
  • Page 499 499
  • Page 500 500
  • Page 501 501
  • Page 502 502
  • Page 503 503
  • Page 504 504
  • Page 505 505
  • Page 506 506
  • Page 507 507
  • Page 508 508
  • Page 509 509
  • Page 510 510
  • Page 511 511
  • Page 512 512
  • Page 513 513
  • Page 514 514
  • Page 515 515
  • Page 516 516
  • Page 517 517
  • Page 518 518
  • Page 519 519
  • Page 520 520
  • Page 521 521
  • Page 522 522
  • Page 523 523
  • Page 524 524
  • Page 525 525
  • Page 526 526
  • Page 527 527
  • Page 528 528
  • Page 529 529
  • Page 530 530
  • Page 531 531
  • Page 532 532
  • Page 533 533
  • Page 534 534
  • Page 535 535
  • Page 536 536
  • Page 537 537
  • Page 538 538
  • Page 539 539
  • Page 540 540
  • Page 541 541
  • Page 542 542
  • Page 543 543
  • Page 544 544
  • Page 545 545
  • Page 546 546
  • Page 547 547
  • Page 548 548
  • Page 549 549
  • Page 550 550
  • Page 551 551
  • Page 552 552
  • Page 553 553
  • Page 554 554
  • Page 555 555
  • Page 556 556
  • Page 557 557
  • Page 558 558
  • Page 559 559
  • Page 560 560
  • Page 561 561
  • Page 562 562
  • Page 563 563
  • Page 564 564
  • Page 565 565
  • Page 566 566
  • Page 567 567
  • Page 568 568
  • Page 569 569
  • Page 570 570
  • Page 571 571
  • Page 572 572
  • Page 573 573
  • Page 574 574
  • Page 575 575
  • Page 576 576
  • Page 577 577
  • Page 578 578
  • Page 579 579
  • Page 580 580
  • Page 581 581
  • Page 582 582
  • Page 583 583
  • Page 584 584
  • Page 585 585
  • Page 586 586
  • Page 587 587
  • Page 588 588
  • Page 589 589
  • Page 590 590
  • Page 591 591
  • Page 592 592
  • Page 593 593
  • Page 594 594
  • Page 595 595
  • Page 596 596
  • Page 597 597
  • Page 598 598
  • Page 599 599
  • Page 600 600
  • Page 601 601
  • Page 602 602
  • Page 603 603
  • Page 604 604
  • Page 605 605
  • Page 606 606
  • Page 607 607
  • Page 608 608
  • Page 609 609
  • Page 610 610
  • Page 611 611
  • Page 612 612
  • Page 613 613
  • Page 614 614
  • Page 615 615
  • Page 616 616
  • Page 617 617
  • Page 618 618
  • Page 619 619
  • Page 620 620
  • Page 621 621
  • Page 622 622
  • Page 623 623
  • Page 624 624
  • Page 625 625
  • Page 626 626
  • Page 627 627
  • Page 628 628
  • Page 629 629

Samsung LE32A550P1R Uživatelský manuál

Kategorie
LCD televizory
Typ
Uživatelský manuál