Barbecook SPRING 2002 Návod k obsluze

Typ
Návod k obsluze
MANUAL
SPRING 2002
BC-GAS-2009
002
Register your Barbecook
®
on
www.barbecook.com
and enjoy the full Barbecook
®
experience!
THIS IS YOUR UNIQUE SERIAL N°
2
[EN] Go to barbecook.com, register your Barbecook and your Barbecook experience
will be further improved!
[NL] Ga naar barbecook.com, registreer uw Barbecook om uw Barbecook-ervaring
nog meer te verbeteren!
[FR] Rendez-vous sur barbecook.com et enregistrez votre appareil Barbecook pour
nous aider à améliorer votre expérience Barbecook.
[DE] Registrieren Sie lhren Barbecook auf barbecook.com, damit Sie ein noch
umfangreicheres Barbecook-Erlebnis genießen können!
[ES] Visite barbecook.com, registre su Barbecook y su experiencia con el producto
será aun mejor.
[IT] Visita il sito barbecook.com , registra il tuo Barbecook e sarai ancora piu vicino al
monde Barbecook!
[PT] Aceda a barbecook.com, registe o seu Barbecook e a sua experiência com a
Barbecook será continuamente melhorada!
[SE] Gå till barbecook.com, registrera din Barbecook och din upplevelse med
Barbecook kommer att bli ännu bättre!”
[DK] Gå til barbecook.com, tilmeld din Barbecook for en endnu bedre Barbecook
oplevelse!
[FI] Rekisteröi Barbecook-grillisi osoitteessa barbecook.com ja pääset nauttimaan
täydellisestä Barbecook-käyttökokemuksesta!
[NO] Gå til barbecook.com, registrer din Barbecook og din Barbecook opplevelse vil
bli enda bedre!
[HU] Látogasson el a barbecook.com oldalra, regisztrálja a Barbecook-ját, és még
több Barbecook élményben lehet része!
[RO] Accesati barbecook.com, înregistrati grătarul Barbecook, iar experienta dvs.
Barbecook va fi muit îmbunătătită
[CS] Navštivte stránky barbecook.com, zaregistrujte si svůj gril Barbecook a vaše
zážitky s produkty Barbecook budou ještě lepší!
[GR] Μεταβείτε στον ιστότοπο barbecook.com και δηλώστε το Barbecook που έχετε
αγοράσει, για να βελτιώσετε ακόµη περισσότερο την εµπειρία Barbecook!
[SK] Prejdite na barbecook.com, zaregistrujte svoj gril Barbecook a vaše zážitky s
Barbecook budú ešte lepšie!
[ET] Minge aadressile barbecook.com, registreerige oma Barbecook ja teil avaneb
võimalus kasutada oma Barbecooki veelgi paremini!
[LT] Eikite į barbecook.com, užregistruokite savo „Barbecook” kepsninę ir patirsite dar
geresnių įspūdžių ją naudodami!
[LV] Atveriet vietni www.barbecook.com, registrejiet savu Barbecook un izmantojiet
Barbecook vēl pilnvērtïgãk!
[PL] Przejdź na stronę barbecook.com, zarejestruj swój produkt Barbecook w celu
umoźliwienia statego udoskonalania produktów Barbecook!
[BG] Посетете barbecook.com, регистрирайте своя Barbecook, за да получите още
по-голямо удовлетворение от Barbecook!
[SL] Pojdite na spletno stran barbecook.com, registrirajte vašo napravo Barbecook in
vasa izkusnja Barbecook bo se boljsa!
[HR] Posjetite stranicu barbecook.com, registrirajte Vaš proizvod Barbecook i još više
uživajte u korištenju proizvoda Barbecook.
3
EN - User guide .....................................................................................5
NL - Gebruiksaanwijzing .....................................................................17
FR - Mode d’emploi
.............................................................................31
DE - Bedienungsanleitung
..................................................................45
ES - Guía del usuario
...........................................................................59
IT - Guida all’uso
..................................................................................73
PT - Manual do utilizador
....................................................................87
SV - Bruksanvisning
..........................................................................101
D
A - Brugervejledning .......................................................................115
FI - Käyttöopas
..................................................................................127
NO - Bruk
erhåndbok
.........................................................................139
HU - Használati utasítás
...................................................................151
RO - Ghid de utilizar
e
........................................................................163
CZ - Uživat
elská příručka
.................................................................175
EL - Οδηγίες χρήσης
.........................................................................187
SK – Návod na používanie
................................................................199
ET – Kasutusjuhend
..........................................................................211
L
T – Naudotojo vadovas
....................................................................223
L
V – Lietošanas pamācība
................................................................235
PL – Instrukcja użytk
ownika
.............................................................247
BG - Рък
оводство за потребителя
................................................259
SI – P
riročnik za uporabo ..................................................................271
HR - Korisnički priručnik
..................................................................283
Illustr
ations
........................................................................................295
4
5
EN - USER GUIDE
1 Regist
er your appliance
......................................................6
2 About this manual ...............................................................6
3 Impor
tant safety instructions
..............................................6
Read and follow the instructions ....................................6
Be cautious with gas ......................................................6
Select an appr
opriate location
........................................6
Safety warnings ..............................................................6
4 Recurr
ent concepts
............................................................6
Venturis ...........................................................................6
Burner hoods ..................................................................7
Enamel ............................................................................7
Flare-ups .........................................................................7
5 Assembling the appliance ...................................................7
Safety instructions ..........................................................7
T
o assemble the appliance
.............................................7
6 Connecting gas t
o the appliance
........................................7
Which cylinder
, hose and regulator?
..............................7
Safety instructions ..........................................................7
Connecting the hose t
o the appliance
............................7
Connecting the hose and cylinder t
o
the r
egulator
....................................................................8
Replacing the cylinder ....................................................9
7 Checking for gas leaks .......................................................9
Why check for gas leaks? ...............................................9
When check for gas leaks? .............................................9
Safety instructions ..........................................................9
Which materials do I need? ............................................9
To check for gas leaks ....................................................9
In case of a gas leak .......................................................9
8 Getting the appliance r
eady for use
..................................10
Befor
e each use
............................................................10
Before first use (in a long time) .....................................10
Burning in the appliance ...............................................10
9 Lighting the burners ..........................................................10
Safety instructions ........................................................10
Lighting the main burners .............................................10
Switching the burners o ..............................................11
Relighting the burners ...................................................11
Checking the flame .....................................................11
10 Useful tips and tricks ........................................................12
P
reheating the appliance
..............................................12
P
reventing food form sticking
.......................................12
Dir
ect and indirect grilling
.............................................12
Grilling with closed lid ...................................................12
W
atching the temperature
............................................12
T
aking advantage of the heat zones
.............................12
Avoiding flare-ups .........................................................12
11 Maintaining the appliance .................................................12
Cleaning the grill ...........................................................12
Cleaning the bowl .........................................................12
Cleaning the burners and venturis ................................12
Maintaining enamel, stainless st
eel, chrome and
powder coat
ed parts
....................................................13
S
toring the appliance
....................................................13
S
toring gas cylinders
....................................................13
Or
dering spare parts
.....................................................14
12 W
arranty
............................................................................14
Cover
ed
........................................................................14
Not cover
ed
..................................................................14
13 T
echnical specification
....................................................14
Type label ......................................................................14
Injector diameters .........................................................14
14 Troubleshooting
..................................................................15
6
1 REGISTER YOUR APPLIANCE
Thank you for purchasing a Barbecook appliance! A whole new
world is waiting for you to e
xplore, whether it be in the peace
and quiet of nature or amidst the hustle and bustle of the city.
Become a grill master in our #barbecook community and let us
put your grill skills in the spotlight.
Register your Barbecook appliance online and get some major
benets:
You get access to the full user manual and get to know
every bit of your appliance.
You benet from a personalized after sales service, allowing
you to quickly nd spare parts and to prot from an optimal
warranty service.
We inform you about product updates and give you tips,
tricks and grillspiration to bring out the grill master in you.
Ready for an adventure? Register your product and join the
#barbecook community!
For more information about registering your appliance,
refer to www.barbecook.com.
Barbecook respects your privacy. Your data will not be
sold, distributed or shared with third parties.
2 ABOUT THIS MANUAL
This manual is composed of two parts:
The rst part is what you are r
eading now. It includes
instructions for the assembly, use and maintenance of your
appliance.
The second part star
ts on page 295. It includes all kinds of
illustrations (exploded views, assembly drawings...) of the
appliances that are described in this manual.
3 IMPORTANT SAFET
Y
INSTRUCTIONS
3.1 Read and follow the instructions
Read the instructions befor
e using the appliance. Always follow
the instructions carefully. Assembling or using the appliance
differently can cause fires and material damage.
Damages caused by not following the instructions
(improper assembly, misuse, inadequate maintenance...)
are not covered by the warranty.
3.2 Be cautious with gas
Working with gas is perfectly safe, but r
equires some extra
caution:
Always store gas cylinders outdoors, in a well-ventilated
area. Make sure they are not exposed to excessive heat or
direct sunlight.
Never store your gas cylinder or spare gas cylinder in the
cabinet of your appliance.
Never store your spare gas cylinder near a gas appliance in
use.
Tum off the gas supply at the gas cylinder after use.
Never smoke near a gas appliance in use of near a gas
cylinder (full/empty).
If you smell gas, immediately close the gas supply,
extinguish all flames and open the lid of the appliance.
If the smell lasts, call your gas supplier or the fire
department.
3.3 Select an appropriate location
Use the appliance outdoors only. Using it indoors, even in a
garage or shed, can cause carbon mono
xide poisoning.
When selecting an outdoor location, always:
Place the appliance at least three meters away from any
building, in an open and well-ventilated area.
Make sure there is a free air flow to the burners and the
vent holes in the cabinet at all times.
Make sure the appliance is not under an overhanging
structure (a porch, a shelter ... ) or under foliage.
Put the appliance on a firm and stable surface. Never put it
on a moving vehicle (a boat, a trailer ... ).
3.4 Safety warnings
Use outdoors only.
Read the instructions before using the appliance.
Do not move the appliance during use.
Do not leave the appliance unattended during use,
especially in the presence of children and animals.
WARNING: accessible parts may be very hot. Keep young
children away.
Use appropriate protection when handling hot parts (lid,
grill ... ).
This appliance must be kept away from flammable materials
during use.
Do not use wood, charcoal, lava rocks or ceramic briquettes
on a gas appliance.
Do not use the appliance when you have consumed alcohol
or taken drugs.
Tum off the gas supply at the gas cylinder after use.
Do not modify the appliance.
4 RECURRENT CONCEPTS
This part includes denitions of some less familiar concepts.
These concepts are used in several t
opics of the manual.
4.1 Venturis
The venturis ar
e the small tubes attached t
o the entr
ance of the
burners. At the side of the venturis, there is a hole. This is visible
on the main burners and on the side burner:
7
When the gas is on its way to the burners, it passes through the
venturis. Thanks to the holes at the sides, the gas is then mix
ed
with air and - as a result - with oxygen. This is necessary for a
good ignition in the burners: only the correct mixture of gas and
oxygen will ignite properly and will result in nice flames.
4.2 Burner hoods
The burner hoods are the hoods that you mount above the
burners of your appliance. They protect the burners from
dripping fat. The holes at the sides of the hoods also
distribute the heat over the grill, so it is heated much faster
and more evenly.
4.3 Enamel
Some parts of the appliance are covered in a layer of melted
glass, called enamel. This enamel protects the underlying metal
from corrosion. Enamel is a high-quality material: it is resistant
to rust, does not fade under the influence of high temperatures
and is very easy to maintain.
Because the enamel is less flexible than the
underlying metal, it may get chipped-up easily if the
appliance is manipulated incorrectly. To avoid problems,
be careful when assembling enamelled parts and always
maintain the enamel as described further in this manual.
4.4 Flar
e-ups
Flare-ups are sudden flames that spark from the bowl when
you are grilling. They are usually caused by dripping fat or
marinade.
5 ASSEMBLING THE APPLIANCE
5.1 Safety instructions
Do not modify the appliance when assembling it. lt is very
dangerous and not allowed to alt
er parts that are pre-
assembled and/or sealed by the manufacturer.
Always follow the assembly instructions carefully.
The user is responsible for the correct assembly of the
appliance. Damages caused by improper assembly are not
covered by the warranty.
5.2 To assemble the appliance
You need a cross-slotted screwdriver, a
flat-slot
t
ed screwdriver
and an AA battery (electrical igniter). There are no batteries
supplied with the appliance.
1. Put the appliance on a flat and clean surface.
2. Assemble the appliance as shown on the assembly
drawings. You find them in the second part of this manual,
after the exploded view of your appliance.
Be careful when assembling enamelled parts. The tools
and screws may damage the enamel. Use the provided
fiber washers to protect the enamel around the screws.
The blister packs can contain more screws than
necessary. Screws can be left over after the assembly.
The package includes an emergency kit with spare
assembly parts (screws, beits, fiber washers ... ) you
can use them in case you lost or broke some parts.
6 CONNECTING GAS TO THE
APPLIANCE
6.1 Which cylinder, hose and regulator?
Before you can connect gas to the appliance, you have to buy
a gas cylinder
, hose and pressure regulator. The table below
shows you which cylinder, hose and regulator you have to use.
In Belgium (BE), for example, you have to use a propane cylinder
with a hose and regulator for 37 mbar or a butane cylinder with a
hose and regulator for 28-30 mbar.
This barbecue has been adjusted to be operate with 4,5
to 15 kg butane/propane cylinders with an appropriate
low pressure regulator. We recommend connecting the
appliance to propane. Propane offers a high-quality
combustion and is less sensitive to frost. The height H of
the cylinder must be less than 70 cm, regardless of the
cylinder’s width or diameter D.
Buy your pressure regulator and gas cylinder together.
Not all regulators fit all cylinders.
Use only a gas hose and regulator that is homologated
for the country of use.
6.2 Safety instructions
Never connect the cylinder directly to the appliance. Always
mount a pressure regulator on the cylinder first.
Never modify pre-assembled or sealed parts of the cylinder,
the hose or the pressure regulator.
Keep the hose as short as possible (1,5 m maximum) to
prevent it from dragging on the ground.
Never distort or twist the hose. Do not pull or pierce the
hose. Keep the hose away from any parts of the
barbecue that get hot. Check that the flexible hose
stretches out normally, without twisting or pulling.
It should be replaced if it is damaged or cracked, when
required by national regulations or at the end of the part
lifecycle (f.ex France)
Never open the gas supply.
Always keep the cylinder in an upright position.
Check for leaks each time you make changes to the gas
connection. See “7 Checking for gas leaks”.
6.3 Connecting the hose to the appliance
France:
The equipment may be used with two types of flexible
hose:
Flexible hose designed to be joined onto ringed tailpieces
on both the barbecue and regulator sides, held firmly
with collars (in accordance with standard XP D 36-110).
recommended length 1.25 m.
Flexible hose (according to standard XP D 36-112) fitted
with a G 1/2 threaded nut for fixing to the barbecue and
a M 20 x1.5 threaded nut for fixing to the regulator,
recommended length 1.25 m.
ES, GB, IE, PT, BE,
FR, LU, IT, CY
DK, GR, NO, SE, EE,
LT, LV, CZ, PL, MT,
HU, SI, SK, NL
Country
Cylinder, hose and
regulator
Propane, 30 mbar /
Butane, 30 mbar
Propane, 37 mbar /
Butane, 28-30 mbar
Other countries:
It should be used with flexible hose that is suitable for use with
butane and propane gas. Hose length should not exceed 1.50 m.
To connect the gas hose to the appliance, you have to mount a
coupling on the gas tube of the appliance. The appliance comes
with two couplings, both intended for particular countries:
A
B
Country
Coupling
BE, CH, CZ, DK, ES,
FI, GB, IE, IT, PT, SI
Coupling A
2. Screw the gas hose on the coupling (C) and tighten it with
two spanners. Hold the coupling with a 22 mm spanner,
while tuming the hose with an adjustable spanner (D).
FR
Coupling B
lf your country is not in the table, use the coupling that
complies with your national standards.
C
D
6.4 Connecting the hose and cylinder to
the regulator
Depending on the type of pressure regulator you use, you need a
cross-slotted screwdriver and/or an adjustable spanner.
6.3.1 COUPLING A
You need a 19 mm spanner and a cross-slotted screwdriver.
1. Screw the coupling on the gas tube of the appliance (A) and
tighten it with a 19 mm spanner (B).
A
B
2. Slide the hose over the coupling (C) and tighten the
clamping ring with a cross-slotted screwdriver (D).
C
D
6.3.2 COUPLING B
You need a 22 mm spanner and an adjustable spanner.
Use only regulators complying with EN 16129.
1. Screw the coupling on the gas tube of the appliance (A) and
tighten it with a 22 mm spanner (B).
8
www.barbecook.com
1. Connect the hose to the pressure regulator. Do one of the
following:
If the hose has a clamping ring, slide the hose over the
regulator and tighten the clamping ring with a cross-
slotted screwdriver (A).
If the hose has a nut, screw the hose on the regulator
and tighten the nut with an adjustable spanner (B).
2. Connect the pressure regulator to the gas cylinder. Do one
of the following:
If the regulator has a nut, screw the regulator clockwise
on the cylinder and tighten the nut with an adjustable
spanner (C).
If the regulator has a screw thread, screw the regulator
counter-clockwise on the cylinder (D).
9
6.5 Replacing the cylinder
1. Close the gas supply and set all control knobs t
o OFF.
2. Disconnect the empty cylinder and connect the full cylinder.
3. Check the cylinder, the hose and all gas connections for
leaks. See “7 Checking for gas leaks”.
A
ttention, when changing the gas cylinder, this should
always be carried out away from any source of ignition.
7 CHECKING FOR GAS LEAKS
7.1 Why check for gas leaks?
Propane and butane are heavier than air. As a result, they do
not float away when leaking from the appliance. Especially
on windless days, a leak can cause the gas to collect in and
around the appliance. That accumulated gas can then ignite and
explode.
7.2 When check for gas leaks?
Before the first use or before the first use after a long period
of non-use.
Also check for gas leaks if your appliance was assembled
by your dealer.
Each time you replace a gas component.
At least once a year
, preferably at the beginning of the
season.
7.3 Safety instructions
Put the appliance outdoors, in a well-ventilated area. Make
sure there are no flames or heat sources near the appliance.
Never use a lighter or match to check for gas leaks.
Do not smoke and do not light the burners when checking
for gas leaks.
7.4 Which materials do I need?
To check for gas leaks, you need:
A testing liquid. Y
ou can use a ready-made leak spray or a
mixture of water (50%) and dish-washing soap (50%).
The leak test tool that came with your appliance. You
use it to suck up the testing liquid and apply it to the gas
component or connection that you want to check.
7.5 To check for gas leaks
You check for gas leaks by applying a t
esting liquid to all gas
components and connections. lf the bubbles on a particular
component or connection grow, there is gas leak:
To check for gas leaks, pr
oceed as follows:
1. Put the appliance outside.
2. Get your leak test t
ool and testing liquid (leak spray or
water/soap mixture).
3. Open the lid and set all control knobs t
o OFF.
4. Open the gas supply slightly. Tum the valve of the gas
cylinder only once.
5. Suck up some testing liquid with the leak t
est tool and apply
it to the area that you want to check. You have to check:
The welds of the gas cylinder (A)
The hose (B)
The connections between the cylinder and the pressur
e
regulator and between the pressure regulator and the
hose (C)
The connection between the hose and the appliance (D)
Your pressure regulator and coupling may be
different from the ones in the illustrations.
6. Do one of the following:
If you detect a leak, continue as described in “In case of
a gas leak”
.
If there ar
e no leaks, close the gas supply, rinse all
components thoroughly with water and dry them well.
7.6 In case of a gas leak
1. Close the gas supply and do one of the following:
If you detected a leak on one of the connections, tighten
that connection.
If you detected a leak on the cylinder or hose, replace
the cylinder or hose.
2. Recheck the connection or component on which you
detected the leak.
3. If the leak is not repair
ed, contact a Barbecook dealer. Do
not use the appliance until the leak is repaired.
For a list of nearby Barbecook dealers, refer to
www.barbecook.com.
10
8 GETTING THE APPLIANCE READY
FOR USE
8.
1 Before each use
Each time you use the appliance, make sur
e that:
The appliance is in an appropriate location. See “3.3 Select
an appropriate location”.
The gas hose does not drag on the ground and cannot
come into contact with a hot surface or with dripping fat.
The bowl is clean. We recommend cleaning the bowl after
each use. See “11.2 Cleaning the bowl”.
The burners and venturis are not blocked by insect nests or
spider webs. See “11.3 Cleaning the burners and venturis”.
The burners are assembled correctly. The venturis have to
be placed over the openings of the gas valves.
lf you want to be absolutely sure that your gas connection
is okay, you can check your appliance on gas leaks
before each use. See “7 Checking for gas leaks”.
8.2 Before first use (in a long time
lf you use the appliance for the first time or for the first tim
aft
er a long period of non-use, you have t
o execute some extra
checks:
Make sure that you have read, understood and checked all
the instructions in this manual (only before first use).
Check the appliance for gas leaks. See “7 Checking for gas
leaks”.
Also check for gas leaks if your appliance was assembled
by your dealer.
Clean the burners and venturis (only before first use in
long time) . See “11.3 Cleaning the burners and venturis”.
Burn in the appliance before you put any food on it (only
before first use). See “8.3 Burning in the appliance."
8.3 Burning in the appliance
By burning in the appliance before the first use, you remove
remaining manufacturing greases from the appliance. Proceed
as follows:
1. Light the main burners and set their control knobs t
o HIGH.
See “9.2 Lighting the main burners”.
2. Close the lid and let the appliance burn for 15 minutes. Do
not put any food on the grill yet.
3. After 15 minutes, open the lid and let the appliance burn for
another 5 minutes (control knobs still set to HIGH).
4. After 5 minutes, the appliance is ready for use. You can now
put food on the grill.
9 LIGHTING THE BURNERS
To light the burners with the electrical igniter, you have
to install an AA battery in the igniter. That battery is not
supplied with the appliance. You find the battery case
of the igniter on the control panel of your appliance.
9.1 Safety instructions
Before you light the appliance, e
xecute all checks listed in
“8 Getting the appliance ready for use”.
Make sure the lid is always open when you light a burner .
Never bend directly over a burner when lighting it.
9.2 Lighting the main burners
9.2.1 U
SING
THE
IGNITER
1. Open the lid and set the control knobs of the main burners
t
o OFF.
2. lf no other burner is lit yet, open the gas supply and wait ten
seconds. This allows the gas to stabilize.
3. Press the igniter until you hear sparks.
4. While holding the igniter, set the control knob of the middle
burner to HIGH. Always light the middle burner first, neve
try to lit all main burners at the same time.
5. lf the burner does not light after three attempts, set its
control knob to OFF, close the gas supply and wait 5
minutes. This allows any accumulated gas to escape.
6. Retry lighting the burner. lf it still does not light, try lighting
it with a match or refer to “14 Troubleshooting” to determine
the cause of the problem.
7. Once one burner is lit, light the ether burners by setting their
control knobs to HIGH.
9.2.2 USING A MATCH
1. Place a match in the match holder.
2. Open the lid and set the contr
ol knobs of the main burners
to OFF.
3. lf no other burner is lit yet, open the gas supply and wait ten
seconds. This allows the gas to stabilize.
4. Light the match and hold it about 13 mm from the burner.
11
5. Set the contr
ol knob of one burner to HIGH.
Always light one main burner to start with. Never light all
main burners at the same time.
6. lf the burner does not light within 5 seconds, set its control
knob to OFF, close the gas supply and wait 5 minutes. This
allows any accumulated gas to escape.
7. Retry lighting the burner. lf it still does not light, refer to “14
Troubleshooting” to determine the cause of the problem.
8. Once one burner is lit, light the other burners by setting their
control knobs to HIGH.
9.3 Switching the burners o
lf you no longer use the burners, you have t
o switch them off.
Proceed as follows:
1. Close the gas supply.
2. Set the control knobs of the burners to OFF.
By closing the gas supply first, you make sure there is
no gas left in the appliance.
9.4 Relighting the burners
lf a burner goes out while in use, pr
oceed as follows:
1. Open the lid and close the gas supply.
2. Set all control knobs to OFF and wait 5 minutes. This allows
any accumulated gas to escape.
3. Relight the burner(s).
9.5 Checking the flame
Each time you light a burner, you have to check its flames. A
perfect flame is almost comple ely blue, with some yellow at the
top. Sporadic yellow flames are normal and not harmful.
lf there is something wrong with the flames, do one of the
following to solve the problem:
LOW HIG
H
If the flames are... Do the following...
L
ow and entirely yellow
Higher than the bowl
1. Immediately close the gas
supply and set all control
knobs to OFF.
2. Refer to “Troubleshooting”
to determine the cause of
the problem. Most likely, the
venturis are blocked.
1. Immediately close the gas
supply and set all control
knobs to OFF.
2. Wait 5 minutes to allow any
accumulated gas to escape.
3. Relight the burner(s).
4. If the problem persists, refer to
“Troubleshooting” to determine
the cause of the problem.
10 USEFUL TIPS AND TRICKS
10.1 Preheating the appliance
By preheating your appliance, you make sure the grill is hot
enough by the time you put food on it. Proceed as follows:
1. Light the burner(s) and set their control knob(s) to HIGH.
2. Close the lid and leave the appliance for ten minutes.
3. After ten minutes, open the lid and put your food on the grill.
4. lf you need less heat now, set the control knob(s) to a lower
position.
10.2 Preventing food from sticking
To prevent your food from sticking to the grill:
Oil the food lightly with a brush before you put it on the grill.
You can also oil the grill itself.
Preheat the appliance. The warmer the grill when you put food
on it, the less the food will stick.
Do not turn the food too quickly. Let it catch some heat first.
10.3 Direct and indirect grilling
Depending on the type of food you are preparing and on how
you want to prepare it, you can grill directly or indirectly:
When grilling under a closed lid, always keep an eye on
the lid thermometer to make sure the appliance does not
get too hot. See “10.5 Watching the temperature”.
Use
P
ut your food next to
a lit burner, set that
burner to a medium/
low position and close
the lid.
Direct To sear meat and
vegetables
To further cook
seared meat
Indirect
Description
P
ut your food directly
above a lit burner, set
that burner to a high
position and keep the
lid open.
Method
12
10.4 Grilling with closed lid
Closing the lid while grilling has some important advantages:
The temperature of the grill is higher and remains more
constant.
You reduce the cooking time of your food and keep your
food more moist.
You reduce flare-ups and save gas.
When grilling under a closed lid, always keep an eye on
the lid thermometer to make sure the appliance does not
get t
oo hot. See “10.5 Watching the temperature”.
10.5 Watching the temperature
Your appliance is equipped with powerful burners, so it heats
up rapidly and you can keep the temper
ature steady. When
grilling under a closed lid, however, you have to make sure
that the appliance does not get too hot. Keep an eye on the lid
thermometer and take into account the following guidelines:
A normal cooking temperature is about 210 °C. At higher
temperatures, dripping and accumulated fat can ignite.
The temperature should never be over 300 °C for more than
five minutes. This can damage and deform the appliance.
lf the appliance gets too hot, cool it down by opening the
lid and setting the burners to a lower position.
10.6 Taking advantage of the heat zones
When all burners are lit, the burner hoods distribute the heat as
evenly as possible over the grill. Despite this even heating, some
zones are still hotter than others. Y
ou can take advantage of
these heat zones to grill your food to perfection:
You can also create heat zones by playing with the power
of the burners. You can, for example, set a burner to a
lower position and use the zone above that burner for
delicate food or food that needs some time to cook.
10.7 Avoiding flare-ups
During grilling, some flare-ups are normal. Too many flare-
ups, however, increase the temperature in the appliance and
can ignite accumulated fat. To avoid flare-ups:
Make sure the bowl is clean when you start grilling. We
recommend cleaning the bowl after each use. See “11.2
Cleaning the bowl”.
Regularly check if the fat drain hole is not blocked and if the
fat drip tray or cup is not full yet.
When grilling fatty meat, trim excess fat, close the lid and
set the burners to a medium or low position.
11 MAINTAINING THE APPLIANCE
11.1 Cleaning the grill
We recommend cleaning the grill after each use, with a
Barbecook cleaner.
You can also clean the grill with a soft detergent or with
sodium bicarbonate. Never use oven cleaners on the grill.
11.2 Cleaning the bowl
We recommend cleaning the bowl after each use, with a
Barbecook cleaner. Use it the same way you do on the grill.
11.3 Cleaning the burners and venturis
11.3.1 W
HY
CLEAN
THE
BURNERS
AND
VENTURIS
?
Spiders and insects can make webs and nests in the burners
and venturis. This may block the gas supply to the burners. As a
result:
You cannot light the burners. lf you manage to light them
anyway, they will only produce smoky and yellow flames
The gas can start burning outside the venturis, at the control
knobs. These fires are called flash-backs and can result in
serious injuries and material damage.
Use to...
Hotter
Front Grill delicate food (prawns, fish...)
Prepare food that needs some time to
cook (e.g. sausages, chicken
thighs ... )
Center
Hot
Hot
Zone
Hottest
Back
Sear meat and vegetables
Damages caused by blocked burners and venturis are
regarded as inadequate maintenance and are not covered
by the warranty.
11.3.2 WHEN CLEAN THE BURNERS AND VENTURIS?
Y
ou have to clean the burners and venturis of your appliance:
Before the first use after a long period of non-use.
At least twice a year, of which once at the beginning of the
season.
11.3.3 TO CLEAN THE BURNERS AND VENTURIS
1. Remove the burners from the appliance as shown on the
illustrations. lf you notice that a burner is damaged, you
have to replace it.
.
13
11.4 Maintaining enamel, stainless steel,
chrome and powder coat
ed parts
The appliance is composed of enamelled, stainless steel,
chromed and powder coated parts. Each material has to
be maintained differently:
To pr
event formation of rust on stainless steel, avoid
contact with chlorine, salt and iron. We recommend not
using the appliance near the coast, near railways or near
swimming pools.
Damages caused by not following these instructions are
regarded as inadequate maintenance and are not covered
by the warranty.
Below the exploded view of your appliance (second part of the
manual), you find a list with all parts of which the appliance is
composed. This list includes a symbol that specifies the
material of each part, so you can use it to check how you have
to maintain a particular part. The parts list uses the following
symbols:
11.5 Storing the appliance
lf you do not use your appliance for a longer period of time, store
it in a dr
y place. Before you store the appliance:
Disconnect the gas cylinder. Never store your appliance
indoors (not even in a garage or shed) as long as it is
connected to the gas cylinder.
Clean the burners and the grills, rub them with oil and wrap
them in paper.
Cover your appliance with a Barbecook cover. Register your
appliance at www.barbecook.com to find out which cove
you need.
11.6 Storing gas cylinders
These instructions apply to both empty and full gas cylinders.
Always stor
e gas cylinders outdoors, in a well-ventilated
area. Make sure they are not exposed to excessive heat or
direct sunlight.
Never store a gas cylinder in an area that can become very
hot (in a car, on a boat...).
Never store your gas cylinder or spare gas cylinder in the
cabinet of your appliance.
Never store your spare gas cylinder near a gas appliance in
use.
Always store gas cylinders outside the reach of children.
Always store and transport gas cylinders in upright position
Material How t
o maintain this material
Stainless steel
and chrome
Enamel
Powder coated
Do not use aggressive, abrasive or
metal detergents.
Use soft detergents and let them
act on the steel.
Use a soft sponge or cloth.
Rinse thoroughly after cleaning
and dry well before storing.
Do not use sharp objects and do
not knock against a hard surface.
Avoid contact with cold liquids
while still hot.
You can use metal sponges and
abrasive detergents.
Do not use sharp objects. Use soft
detergents and a soft sponge or
cloth.
Rinse thoroughly after cleaning
and dry well before storing.
Symbol
Mat
erial
Enamel
Stainless steel
Chrome
Powder coated
2. Clean the burners and venturis with a small brush or a
homemade pipe cleaner (an unfolded paperclip, a pipe
brush ... ).
3. P
ut the burners back. Make sure to place the venturis over
the openings of the gas valves.
11.7 Ordering spare parts
Parts that are directly exposed to re or intense heat have to be
replaced from time to time. To order a spare part:
1. Look up the reference number of the part you need. You
nd a list of all reference numbers below the exploded views
in the second part of this manual and on www.barbecook.
com.
If you registered your appliance online, you will
automatically be guided to the correct list in your
MyBarbecook account. There you have the possibility to
order your parts online.
2. Order the spare part via www.barbecook.com or at your
point of sale. Parts under warranty can only be ordered at
your point of sale.
14
12 W
ARRANTY
12.1 Covered
Y
our appliance comes with a warranty of two years, starting from
the date of purchase. This warranty covers all manufacturing
defects, provided that:
You used, assembled and maintained your appliance
according to the instructions in this manual. Damages
caused by misuse, incorrect assembly or inadequate
maintenance are not regarded as manufacturing defects.
You can present the receipt and the unique serial number of
your appliance. This serial number starts with a G, followed
by 15 digits. You can nd it:
- On this manual.
- On the packaging of the appliance.
- On the inside of the bott
om front panel.
The Barbecook quality depar
tment con
rms that the par
ts
ar
e defective and that they proved defective under normal
use, correct assembly and adequate maintenance.
lf one of the above conditions is not met, you cannot claim any
form of contribution. In all cases, the warranty is limited to the
repair or replacement of the defective part(s).
12.2 Not covered
The following damages and defects ar
e not covered by the
warranty:
Normal wear and tear (rusting, distortion, discolouration...)
of par
ts that are directly exposed to
r
e or intense heat. It is
normal t
o replace these parts from time to time.
Visual irregularities that are inherent to the manufacturing
process. These irregularities are not regarded as
manufacturing defects.
All damages caused by inadequate maintenance, incorrect
st
orage, improper assembly or modi
cations made t
o
pr
e-assembled parts.
All damages caused by misuse and abuse of the appliance
(not using it according to the instructions in this manual,
using it for commer
cial purposes, using it as a
r
e basket...).
All consequential damages caused by car
eless or
non-compliant use of the appliance.
Rust or discolour
ation caused by external in
uences, the
use of aggr
essive detergents, exposure to chlorine... These
damages are not regarded as manufacturing defects.
13 TECHNIC
AL SPECIFICATIONS
13.1 T
ype label
The type label lists all the t
echnical specifications of your
appliance. You can find it
In the second part of this manual.
On the inside of the bottom front panel.
13.2 Injector diameters
Main burner: 0.95
15
14 TROUBLESHOO
TING
Problem Probable cause(s) Solution(s)
Gas supply not open
Venturis not placed over openings of gas valves
Burner openings blocked
Gas cylinder (almost) empty
Pressure regulator not connected correctly to
cylinder and/or hose
Some heat differences are norrnal, see “1.7 Making
optima! use of the heat” and “10.6 Taking advantage
of the heat zones”. Probable cause(s) for big heat
differences:
Appliance not pr
eheated
Food too fatty
Fat drain hole blocked, fat in bowl and/or fat on
burners
Temperature too high
Burners or venturis blocked
Salt on burners
Appliance connected to butane
Burner blocked, pierced or rusted
Burners or venturis blocked
Lots of wind
Gas cylinder (almost) empty
Fat in bowl or on burners
Hot weather
New (full) gas cylinder
Gas injector, venturi and/or burner dirty
Burner or venturi blocked
No gas supply
No battery installed or battery not installed
correctly
Middle burner not lit firs
lgniter wiring not mounted correctly
Electrode damaged
Faulty ground
Faulty igniter
No battery installed or battery not installed
correctly
Empty battery
lgniter button not assembled correctly
Faulty spark generator
Faulty ground
Low battery
Wet or broken electrodes
Faulty wiring
Faulty ground
Burner and electrode too far apart
Not enough heat
Heat not distributed evenly over
grill surface
Excessive heat and/or fla e-ups
Y
ellow
ames
Flash-backs (ames outside
venturis/at contr
ol knobs)
Flames higher than edge of
bowl
Pressure regulator hums
Burner whistles when set to
LOW
Impossible to light burner
(using either igniter or match)
lmpossible to light burner with
igniter
No sparks nor sound when
pressing igniter
Sparks present, but not on all
electrodes and/or not powerful
enough
Sparks present that do not
originate from burners
Only sound (no sparks) when
pressing igniter
Incomplet
e
ame
Open gas supply
Place venturis over openings of gas valves
Clean burner openings or r
eplace burners
Replace gas cylinder
Reconnect pressure regulator to cylinder and/
or hose
Preheat appliance
Trim excess fat or set burners to a low position
Clean fat drain hole, bowl and burners
Set burners to a lower temperature and/or grill
food indirectly
Clean burners and venturis
Clean burners
Connect appliance to propane, using an
appropriate pressure regulator
Clean or replace burner
Close gas supply and set burners to OFF.
Let appliance cool down.
Clean burners and venturis.
Put appliance with rear side towards wind
Replace gas cylinder
Clean bowl or burners
Not a hazard or defect. Should stop
automatically after a while.
Clean gas injector, venturi and burner
Clean burner and venturi
Open gas supply and press safety knob on
pressure regulator (not present on all regulators)
(Re)install battery, with terminals positioned
correctly
Light the middle burner firs
Check and re-assemble all igniter connections
Replace electrode
Check and re-assemble electrodes, burners
and igniter
Replace igniter
(Re)install battery, with terminals positioned
correctly
Replace battery
Re-assemble igniter button
Replace spark generator
Reconnect spark generator and electrodes
Replace battery
Dry electrodes with paper towels or replace
electrodes
Replace wiring
Reconnect spark generator and electrodes
Slightly bend electrode to bring it closer to the
burner
16
17
NL - GEBRUIKSAANWIJZING
1 Uw t
oestel registreren
.......................................................18
2 Over de
ze handleiding
......................................................18
3 Belangrijke veiligheidsinstructies ......................................18
De instructies le
zen en opvolgen
..................................18
V
oorzichtig omspringen met gas
..................................18
Een geschikt
e locatie kiezen
.........................................18
V
eiligheidsinstructies
....................................................18
4 T
erugkerende concepten .
................................................18
Venturibuizen ................................................................18
Branderkappen .............................................................19
Email .............................................................................19
Opflakkeringen ..............................................................19
5 Het t
oestel monteren
........................................................19
V
eiligheidsinstructies
....................................................19
Het t
oestel monteren
....................................................19
6 Het t
oestel van gas voorzien
............................................19
Welke gasfles, slang en regelaar? ...............................19
V
eiligheidsinstructies
....................................................19
De slang aansluit
en op het toestel
................................19
De slang en gasfles aansluiten op de regelaar .............20
De gasfles vervangen ...................................................21
7 Contr
oleren op gaslekken
.................................................21
W
aarom controleren op gaslekken?
.............................21
W
anneer controleren op gaslekken?
............................21
V
eiligheidsinstructies
....................................................21
W
elke materialen heb ik nodig? ....................................21
Controleren op gaslekken .............................................21
In geval van een gaslek.................................................22
8 Het t
oestel klaarmaken voor gebruik
................................22
V
oor elk gebruik
............................................................22
V
oor het eerste gebruik (of na een lange
periode van ongebruik)
.................................................22
Het t
oestel inbranden
....................................................22
9 De br
anders ontsteken
.....................................................22
V
eiligheidsinstructies
....................................................22
De hoofdbr
anders ontsteken
........................................22
De br
anders uitschakelen
.............................................23
De br
anders opnieuw ontsteken
...................................23
De vlammen contr
oleren
...............................................23
10 Handige tips ......................................................................24
Het t
oestel voorverwarmen
...........................................24
V
oorkomen dat voedsel aankleeft
...............................24
Rechtstr
eeks en onrechtstreeks grillen
.........................24
Grillen met geslot
en deksel
..........................................24
De t
emperatuur controleren
..........................................24
De warmt
ezones benutten
............................................24
Opflakkeringen vermijden .............................................25
11 Het t
oestel onderhouden
..................................................25
Het r
ooster reinigen
......................................................25
De kuip r
einigen
............................................................25
De br
anders en venturibuizen schoonmaken
...............25
Geëmailleer
de, roestvaststalen, verchroomde
en gepoederlakte onderdelen onderhouden
................25
Het t
oestel opbergen
....................................................26
Gasflessen
bewaren
.....................................................26
Reser
veonderdelen bestellen
.......................................26
12 Gar
antie
............................................................................26
Gedekt ..........................................................................26
Niet gedekt ...................................................................26
13 T
echnische gegevens
.......................................................27
Typelabel .......................................................................27
Diameters van de injectoren .........................................27
14 Problemen oplossen
...........................................................27
18
1 UW TOES
TEL REGISTREREN
Bedankt voor uw aankoop van een Barbecook-t
oestel! Er wacht
u een hele nieuwe wereld om te ontdekken, of dat nu in de rust
van de natuur of in de gonzende stad is. Word een grillmaster in
onze #barbecook community en laat ons uw grillvaardigheden in
de schijnwerpers zetten.
Registreer uw Barbecook-toestel online en geniet van enkele
fantastische voordelen:
U krijgt toegang tot de volledige gebruikershandleiding
zodat u uw toestel tot in het kleinste onderdeeltje leert
kennen.
U krijgt van een gepersonaliseerde naverkoopservice,
waardoor u snel reserveonderdelen kunt vinden en geniet
van een optimale garantieservice.
We informeren u over productupdates en geven u tips, tricks
en grillspiratie om de grillmaster in u naar boven te halen.
Klaar voor een avontuur? Registreer uw toestel en word lid van
de #barbecook community!
Voor meer informatie over het registreren van uw toestel
gaat u naar www.barbecook.com.
Barbecook respecteert uw privacy. Uw gegevens worden
niet verkocht, verspreid of doorgegeven aan derden.
2 OVER DEZE HANDLEIDING
Dez
e handleiding bestaat uit twee delen:
Het eerste deel is het deel dat u momenteel leest. Hier vindt
u instructies om uw toestel te monteren, te gebruiken en te
onderhouden.
Het tweede deel begint op pagina 295. Daarin vindt u
diverse illustraties (explosietekeningen, montagetekeningen
... ) van het toestels die in deze handleiding beschreven zijn.
3 BELANGRIJKE
VEILIGHEIDSINS
TRUC
TIES
3.1 De instructies lez
en en opvolgen
Lees de instructies voor u het toestel in gebruik neemt. Volg de
instructies altijd zorgvuldig. Als het toestel op een andere wijze
wordt gemonteerd of gebruikt, kan dit brand en materiële schade
tot gevolg hebben.
Schade wegens het niet opvolgen van de instructies
(verkeer
de montage, misbruik, verkeerd onderhoud enz.)
wordt niet gedekt door de garantie.
3.2 Voorzichtig omspringen met gas
Werken met gas is erg veilig, maar u dient enkele
voorzorgsmaatregelen in acht te nemen:
Bewaar gasflessen altijd buitenshuis in een goed
geventileerde ruimte. Zorg ervoor dat de flessen niet
blootgesteld worden aan hoge temperaturen of direct
zonlicht.
Bewaar uw gasfles of reservegasfles nooit in de kast van
het toestel.
Bewaar uw reservegasfles nooit in de buurt van een toestel
op gas dat in gebruik is.
Draai na het gebruik altijd de gastoevoer aan de gasfles
dicht.
Rook nooit in de buurt van een toestel op gas dat in gebruik
is of in de buurt van een gasfles (vol/leeg)
Als u gas ruikt, draait u onmiddellijk de gastoevoer
dicht, dooft u alle vlammen en opent u het deksel
van het toestel. Als de geur aanhoudt, belt u naar
uw gasleverancier of de brandweer.
3.3 Een geschikte locatie kie
zen
Gebruik het toest
el alleen buitenshuis. Als u het toestel
binnenshuis gebruikt, zelfs in een garage of schuur, bestaat er
gevaar voor vergiftiging door koolmonoxide.
Let op het volgende wanneer u een locatie kiest:
Plaats het toestel op minstens drie meter van een gebouw,
op een open en goed geventileerde plaats.
Zorg ervoor dat er altijd voldoende vrije lucht naar de
branders en naar de ventilatiegaten in de kast kan stromen.
Plaats het toestel niet onder een overhangende structuur
(veranda, afdak ... ) of onder gebladerte.
Plaats het toestel op een stevige en stabiele ondergrond.
Plaats het toestel nooit op een bewegend voertuig (boot,
oplegger ... ).
3.4 Veiligheidsinstructies
Alleen buiten gebruiken.
Lees de instructies voor ingebruikname.
Toestel niet verplaatsen tijdens gebruik
Laat het toestel niet alleen achter terwijl deze in gebruik is,
en dit zeker niet als er kinderen of dieren aanwezig zijn
WAARSCHUWING: Aanraakbare delen kunnen erg heet zijn
Houdt jonge kinderen op afstand.
Gebruik geschikte bescherming wanneer u hete onderdelen
(deksel, rooster enz.) moet vastnemen.
Dit toestel gedurende gebruik verwijderd houden van
ontvlambare materialen.
Gebruik geen hout, houtskool, lavastenen of keramische
briketten in een gastoestel.
Gebruik het toestel niet als u alcohol hebt gedronken of
drugs hebt gebruikt.
Gastoevoer op de gasfles afsluiten na gebruik.
Toestel niet aanpassen of modificeren.
4 TERUGKERENDE CONCEPTEN
Dit deel omvat definities van een aantal minder vertrouwde
concepten. Deze concepten worden gebruikt in verschillende
onderwerpen van de handleiding.
4.1 Venturibuizen
De venturibuizen zijn de kleine buiten die aan de ingang van de
branders bevestigd zijn. Aan de zijkant van de venturibuizen is
er een opening voorzien. Deze is zichtbaar op de
hoofdbranders en op de zij brander:
19
Op weg naar de branders passeert het gas door de
venturibuizen. Via de openingen in de zijkanten wordt het gas
gemengd met lucht, en dus ook met zuurstof. Dit is nodig
voor een goede ontbranding in de branders: alleen een correct
gas-zuurstofmengsel zal goed ontbranden en mooie vlammen
opleveren.
4.2 Branderkappen
De branderkappen
zijn de kappen die gemonteerd worden boven
de branders van het toestel. Ze beschermen de branders tegen
druipend vet. De openingen aan de zijkanten van de kappen
verdelen de warmte over het rooster, zodat het veel sneller en
gelijkmatiger opgewarmd wordt.
4.3 Email
Sommige delen van het toestel zijn bekleed met een laag
gesmolt
en glas, zogenaamd email. Dit email beschermt het
onderliggende metaal tegen corrosie. Email is een kwaliteitsvol
materiaal: het is bestand tegen roest, het verzwakt niet onder
invloed van hoge temperaturen en het is zeer eenvoudig te
onderhouden.
Omdat het email minder flexibel is dan het metaal
waarop het is aangebracht, kunnen stukjes email
loskomen wanneer u het toestel niet correct gebruikt. Om
problemen te vermijden, dient u voorzichtig te zijn
wanneer u geëmailleerde onderdelen monteert en dient u
het email altijd te onderhouden zoals beschreven in
deze handleiding.
4.4 Opflakkeringen
Opflak eringen zijn vlammen die plots uit de kuip springen
tijdens het grillen. e wor
den meestal veroorzaakt door druipend
vet of druipende marinade.
5 HET TOESTEL MONTEREN
5.1 Veiligheidsinstructies
Breng geen wijzigingen aan hettoestel aan wanneer u deze
in elkaar zet. Onderdelen die door de fabrikant werden
voorgemonteerd en/of afgedicht, mogen niet worden
gewijzigd, want dit is zeer gevaarlijk
Volg de montage-instructies altijd zorgvuldig.
De gebruiker is verantwoordelijk voor de correcte montage
van het toestel. Schade veroorzaakt door een foutieve
montage wordt niet gedekt door de garantie.
5.2 Het toestel monteren
U hebt een kruisschroevendraaier, een platte schroevendraaier
en een AA-batterij (elektrische onts
t
eker) nodig. Er zijn geen
batterijen bij het
t
oestel geleverd.
1. Plaats het toestel op een effen en schone ondergrond.
2. Monteer het toestel zoals aangegeven in de
montagetekeningen. U vindt deze in het tweede deel van
deze handleiding, na de explosietekening van uw toestel
Wees voorzichtig bij het monteren van emailonderdelen.
Het gereedschap en de schroeven kunnen het email
beschadigen. Gebruik de bijgeleverde vezelringen om het
email rond de schroeven te beschermen.
Het is mogelijk dat de blisterverpakkingen meer
schroeven dan nodig bevatten, en dat er dus schroeven
overblijven na de montage.
Het pakket omvat een noodkit met reserveonderdelen
(schroeven, bouten, vezelringen enz.) die u kunt gebruiken
als u een onderdeel verloren bent of stukgemaakt hebt.
6 HET TOESTEL V
AN GAS VOORZIEN
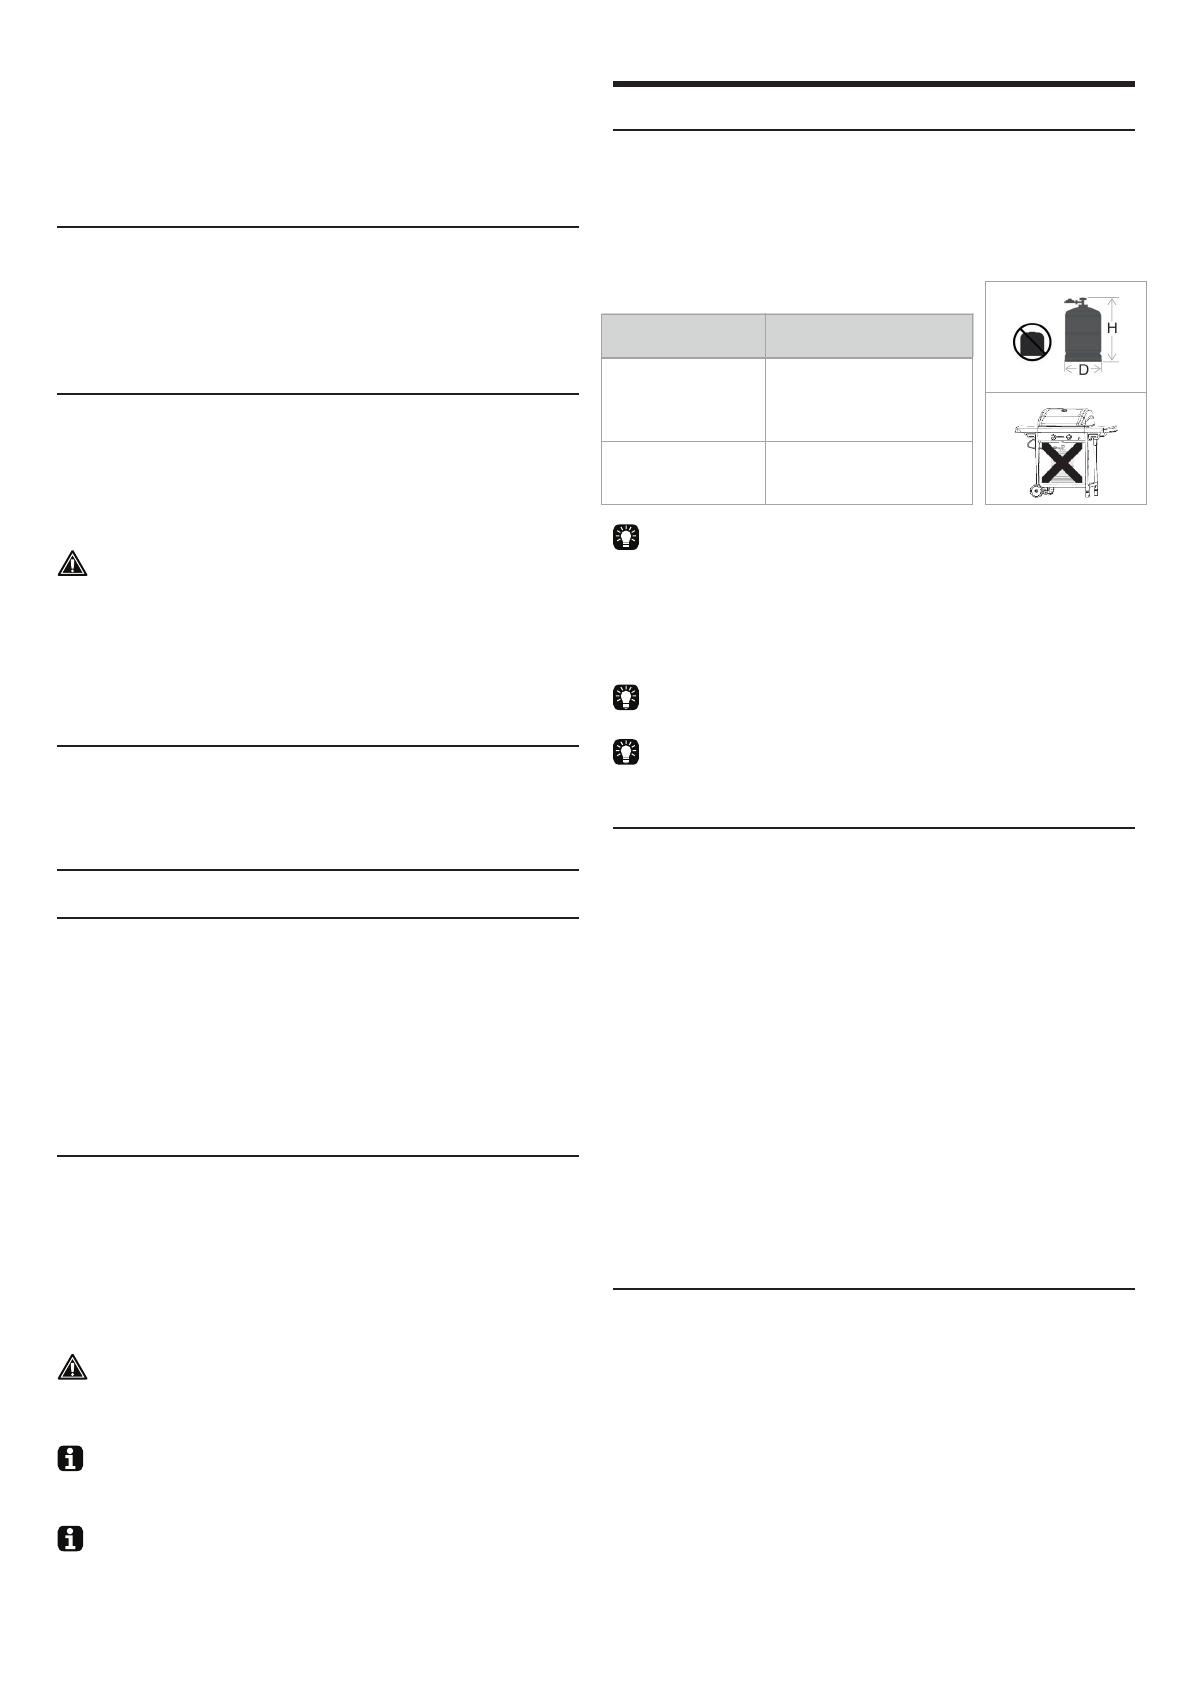
6.1 Welke gasfles, slang en regelaar?
Voor u het toestel van gas kunt voorzien, moet u eerst een
gasfles, een slang en een drukregelaar kopen. In de
onderstaande tabel ziet u welke garfles, slang en regelaar
u moet gebruiken. In België (BE) moet u bijvoorbeeld een
propaanfles gebruiken met een slang en regelaar voor 37 mbar,
of een butaanfles met een slang en regelaar voor 28-30 mbar.
Dit toestel is gefabriceerd om gebruikt te worden met
butaan of propaanflessen van 4,5 tot 15 kg, voorzien van
een gepast reduceerventiel. Wij raden u aan propaan
te gebruiken voor het toestel. Propaan levert een
kwaliteitsvolle verbranding en is minder vorstgevoelig. De
hoogte van de gasfles moet minder dan 70 cm zijn
ongeacht de breedte of doorsnede D van de fles
Koop uw drukregelaar en gasfles altijd samen. Niet alle
regelaars passen op alle gasflessen
Gebruik enkel een gasslang en ontspanner die in het land
van gebruik gehomologeerd zijn
6.2 Veiligheidsinstructies
Sluit de gasfles nooit rechtstreeks aan op het toestel.
Monteer altijd eerst een drukregelaar op de gasfles
Pas voorgemonteerde of verzegelde onderdelen van de
gasfles, slang of druk regelaar nooit aan.
Zorg voor een zo kort mogelijke slang (maximaal 1,5 m) om
te verhinderen dat deze over de grond sleept.
Vervorm of plooi de gasslang nooit. Controleer of de
slang niet gespannen staat of gedraaid is. Laat de slang
nooit onderdelen raken die heet kunnen worden.
De slang moet vervangen worden indien ze beschadigd
is of barsten vertoont, wanneer de nationale
voorschriften dit vereisen of volgens haar geldigheid.
Zet de gasfles altijd rechtop.
Open nooit de gastoevoer
Telkens wanneer u wijzigingen aanbrengt aan de
gasverbindingen, moet u controleren of er gaslekken zijn Zie
“7 Controleren op gaslekken”.
6.3 De slang aansluiten op het toest
el
Frankrijk
Het t
oestel mag met 2 soorten gasslangen worden gebruikt:
Gasslang om op de slangpilaren van het toestel en de
drukregelaar te zetten, vastgezet met slangklemmen
(overeenkomstig de norm XP D 36-110). Aanbevolen lengte
1,25 m
Gasslang (overeenkomstig de norm XP D 36-112) uitgerust
met een schroefdraadmoer G ½ om rechstreeks op het
toestel vast te schroeven en een schroefdraadmoer M 20
x 1,5 om rechtsreeks op de drukregelaar te schroeven,
aanbevolen lengte 1,25 m
ES, GB,, IE, PT, BE,
FR, LU
, IT, CY
DK, GR, NO, SE, EE,
LT, LV, CZ, PL, MT,
HU, SI, SK, NL
Land
Gasfles, slang en
regelaar
Propaan, 30 mbar /
butaan, 30 mbar
Propaan, 37 mbar /
butaan, 28-30 mbar
20
Overige landen:
Het gebruik van een soepele slang geschikt voor butaan- of
propaangas is voor
geschreven. De slang mag niet langer dan
1,50 m zijn
Om de gasslang te kunnen aansluiten op het toestel, moet u een
koppeling monteren op de gasbuis van het toestel. Het toestel
wordt geleverd met twee verschillende koppelingen die bestemd
zijn voor gebruik in verschillende landen
Als uw land niet vermeld staat in de tabel, gebruikt u de
koppeling die beantwoordt aan de normen die gelden in
uw land.
6.3.1 KOPPELING A
U hebt een moersleutel van 19 mm en een kruisschr
oevendraaier
nodig.
1. Schroef de k
oppeling op de gasbuis van het toestel (A) en
draai deze vast met een moersleutel van 19 mm (B).
2. Schuif de slang over de koppeling (C) en span de spanring
aan met een kruisschroevendraaier (D).
6.3.2 K
OPPELING
B
U hebt een moersleutel van 22 mm en een Engelse sleut
el nodig.
1. Schroef de k
oppeling op de gasbuis van het toestel (A) en
draai deze vast met een moersleutel van 22 mm (B).
2. Schroef de gasslang op de koppeling (C) en draai deze aan
met twee moersleutels. Houd de koppeling vast met een
moersleutel van 22 mm en draai terwijl de slang vast me
een Engelse sleutel (D).
6.4 De slang en gasfles aanslui en op de
regelaar
Afhankelijk van het gebruik
e type drukregelaar hebt u een
kruisschroevendraaier en/of een Engelse sleutel nodig.
1. Sluit de slang aan op de drukregelaar
. Ga als volgt te werk:
Als de slang uitgerust is met een spanring, schuift u de
slang over de regelaar en spant u de spanring aan met
een kruisschroevendraaier (A).
Als de slang uitgerust is met een moer, schroeft u de
slang op de regelaar en draait u de moer aan met een
Engelse sleutel (B).
2. Sluit de drukregelaar aan op de gasfles. Ga als volgt te
werk:
Als de regelaar uitgerust is met een moer, schroeft u de
regelaar rechtsom op de gasfles en draait u de moer
aan met een Engelse sleutel (C).
Als de regelaar voorzien is van schroefdraad, schroeft u
de regelaar linksom op de gasfles (D
Gebruik enkel drukr
egelaars die aan de EN 16129
voldoen.
C
D
A
B
C
D
A
B
Koppeling
K
oppeling A
Koppeling B
Land
FR
BE, CH, CZ, DK, ES,
FI, GB, IE, IT, PT
, SI
  • Page 1 1
  • Page 2 2
  • Page 3 3
  • Page 4 4
  • Page 5 5
  • Page 6 6
  • Page 7 7
  • Page 8 8
  • Page 9 9
  • Page 10 10
  • Page 11 11
  • Page 12 12
  • Page 13 13
  • Page 14 14
  • Page 15 15
  • Page 16 16
  • Page 17 17
  • Page 18 18
  • Page 19 19
  • Page 20 20
  • Page 21 21
  • Page 22 22
  • Page 23 23
  • Page 24 24
  • Page 25 25
  • Page 26 26
  • Page 27 27
  • Page 28 28
  • Page 29 29
  • Page 30 30
  • Page 31 31
  • Page 32 32
  • Page 33 33
  • Page 34 34
  • Page 35 35
  • Page 36 36
  • Page 37 37
  • Page 38 38
  • Page 39 39
  • Page 40 40
  • Page 41 41
  • Page 42 42
  • Page 43 43
  • Page 44 44
  • Page 45 45
  • Page 46 46
  • Page 47 47
  • Page 48 48
  • Page 49 49
  • Page 50 50
  • Page 51 51
  • Page 52 52
  • Page 53 53
  • Page 54 54
  • Page 55 55
  • Page 56 56
  • Page 57 57
  • Page 58 58
  • Page 59 59
  • Page 60 60
  • Page 61 61
  • Page 62 62
  • Page 63 63
  • Page 64 64
  • Page 65 65
  • Page 66 66
  • Page 67 67
  • Page 68 68
  • Page 69 69
  • Page 70 70
  • Page 71 71
  • Page 72 72
  • Page 73 73
  • Page 74 74
  • Page 75 75
  • Page 76 76
  • Page 77 77
  • Page 78 78
  • Page 79 79
  • Page 80 80
  • Page 81 81
  • Page 82 82
  • Page 83 83
  • Page 84 84
  • Page 85 85
  • Page 86 86
  • Page 87 87
  • Page 88 88
  • Page 89 89
  • Page 90 90
  • Page 91 91
  • Page 92 92
  • Page 93 93
  • Page 94 94
  • Page 95 95
  • Page 96 96
  • Page 97 97
  • Page 98 98
  • Page 99 99
  • Page 100 100
  • Page 101 101
  • Page 102 102
  • Page 103 103
  • Page 104 104
  • Page 105 105
  • Page 106 106
  • Page 107 107
  • Page 108 108
  • Page 109 109
  • Page 110 110
  • Page 111 111
  • Page 112 112
  • Page 113 113
  • Page 114 114
  • Page 115 115
  • Page 116 116
  • Page 117 117
  • Page 118 118
  • Page 119 119
  • Page 120 120
  • Page 121 121
  • Page 122 122
  • Page 123 123
  • Page 124 124
  • Page 125 125
  • Page 126 126
  • Page 127 127
  • Page 128 128
  • Page 129 129
  • Page 130 130
  • Page 131 131
  • Page 132 132
  • Page 133 133
  • Page 134 134
  • Page 135 135
  • Page 136 136
  • Page 137 137
  • Page 138 138
  • Page 139 139
  • Page 140 140
  • Page 141 141
  • Page 142 142
  • Page 143 143
  • Page 144 144
  • Page 145 145
  • Page 146 146
  • Page 147 147
  • Page 148 148
  • Page 149 149
  • Page 150 150
  • Page 151 151
  • Page 152 152
  • Page 153 153
  • Page 154 154
  • Page 155 155
  • Page 156 156
  • Page 157 157
  • Page 158 158
  • Page 159 159
  • Page 160 160
  • Page 161 161
  • Page 162 162
  • Page 163 163
  • Page 164 164
  • Page 165 165
  • Page 166 166
  • Page 167 167
  • Page 168 168
  • Page 169 169
  • Page 170 170
  • Page 171 171
  • Page 172 172
  • Page 173 173
  • Page 174 174
  • Page 175 175
  • Page 176 176
  • Page 177 177
  • Page 178 178
  • Page 179 179
  • Page 180 180
  • Page 181 181
  • Page 182 182
  • Page 183 183
  • Page 184 184
  • Page 185 185
  • Page 186 186
  • Page 187 187
  • Page 188 188
  • Page 189 189
  • Page 190 190
  • Page 191 191
  • Page 192 192
  • Page 193 193
  • Page 194 194
  • Page 195 195
  • Page 196 196
  • Page 197 197
  • Page 198 198
  • Page 199 199
  • Page 200 200
  • Page 201 201
  • Page 202 202
  • Page 203 203
  • Page 204 204
  • Page 205 205
  • Page 206 206
  • Page 207 207
  • Page 208 208
  • Page 209 209
  • Page 210 210
  • Page 211 211
  • Page 212 212
  • Page 213 213
  • Page 214 214
  • Page 215 215
  • Page 216 216
  • Page 217 217
  • Page 218 218
  • Page 219 219
  • Page 220 220
  • Page 221 221
  • Page 222 222
  • Page 223 223
  • Page 224 224
  • Page 225 225
  • Page 226 226
  • Page 227 227
  • Page 228 228
  • Page 229 229
  • Page 230 230
  • Page 231 231
  • Page 232 232
  • Page 233 233
  • Page 234 234
  • Page 235 235
  • Page 236 236
  • Page 237 237
  • Page 238 238
  • Page 239 239
  • Page 240 240
  • Page 241 241
  • Page 242 242
  • Page 243 243
  • Page 244 244
  • Page 245 245
  • Page 246 246
  • Page 247 247
  • Page 248 248
  • Page 249 249
  • Page 250 250
  • Page 251 251
  • Page 252 252
  • Page 253 253
  • Page 254 254
  • Page 255 255
  • Page 256 256
  • Page 257 257
  • Page 258 258
  • Page 259 259
  • Page 260 260
  • Page 261 261
  • Page 262 262
  • Page 263 263
  • Page 264 264
  • Page 265 265
  • Page 266 266
  • Page 267 267
  • Page 268 268
  • Page 269 269
  • Page 270 270
  • Page 271 271
  • Page 272 272
  • Page 273 273
  • Page 274 274
  • Page 275 275
  • Page 276 276
  • Page 277 277
  • Page 278 278
  • Page 279 279
  • Page 280 280
  • Page 281 281
  • Page 282 282
  • Page 283 283
  • Page 284 284
  • Page 285 285
  • Page 286 286
  • Page 287 287
  • Page 288 288
  • Page 289 289
  • Page 290 290
  • Page 291 291
  • Page 292 292
  • Page 293 293
  • Page 294 294
  • Page 295 295
  • Page 296 296
  • Page 297 297
  • Page 298 298
  • Page 299 299
  • Page 300 300
  • Page 301 301
  • Page 302 302
  • Page 303 303
  • Page 304 304
  • Page 305 305
  • Page 306 306
  • Page 307 307
  • Page 308 308
  • Page 309 309
  • Page 310 310

Barbecook SPRING 2002 Návod k obsluze

Typ
Návod k obsluze