Haier HAFRSJ64MC Uživatelský manuál

Typ
Uživatelský manuál

Tato příručka je také vhodná pro

HAIER
HAFRSJ64MC
ENGLISH
Instruction Manual For Induction Hob
ITALIANO
Manuale di istruzioni per piano di cottura ad induzione
POLSKI
Instrukcja obsługi płyty indukcyjnej
FRANÇAIS
Manuel d’utilisation de la table de cuisson à induction
ESPAÑOL
Manual de instrucciones de la encimera de inducción
DEUTSCH
Bedienungsanleitung für Induktionskochfeld
Návod na obsluhu indukčnej varnej dosky
SLOVENČINA
Návod k obsluze indukční varné desky
ČEŠTINA
Manual de instruções para placa de indução
PORTUGUÊS
Ръководство за употреба на индукционен плот
БЪЛГАРСКИ
By placing CE mark on this product, we are confirming com-
pliance to all relevant European safety, health and environmental
requirements which are applicable in legisla�on for this product.
As applicable
EN-2
ENGLISH
EN-3
EN-4
ENGLISH
Haier
Haier
Haier
EN-5
1. Max. 2000/3000 W zone
2. Max. 2000/3000 W zone
3. Max. 1800/2300 W zone
4. Max. 1800/2300 W zone
5. Max. 3000/4000 W zone
6. Glass plate
7. Control panel
1. Heating zone power controls
2. "Cook with me Function control"
3. Timer control
4. Flexible Area control
6. ON/OFF control
Keylock .5
1
2
3
4
5
6
7
1
2
3
4
5
6
EN-6
ENGLISH
Touch Controls
The controls respond to touch, so you don’t need to apply any pressure.
Use the ball of your finger, not its tip.
You will hear a beep each time a touch is registered.
Make sure the controls are always clean, dry, and that there is no object (e.g. a utensil or a cloth) covering them.
Even a thin film of water may make the controls difficult to operate.
Choosing the right Cookware
Only use cookware with a base suitable for induction cooking.
Look for the induction symbol on the packaging or on the bottom
of the pan.
• You can check whether your cookware is suitable by carrying out a magnet test.
Move a magnet towards the base of the pan. If it is attracted, the pan is suitable
for induction.
• If you do not have a magnet:
1. Put some water in the pan you want to check.
2. If does not flash in the display and the water is heating, the pan is suitable.
• Cookware made from the following materials is not suitable: pure stainless steel, aluminium or copper
without a magnetic base, glass, wood, porcelain, ceramic, and earthenware.
Do not use cookware with jagged edges or a curved base.
Make sure that the base of your pan is smooth, sits flat against the glass, and is the same size as the cooking zone.
Use pans whose diameter is as large as the graphic of the zone selected. Using a pot a slightly wider energy will be
used at its maximum efficiency. If you use smaller pot efficiency could be less than expected. Pot less than 140 mm
could be undetected by the hob. Always centre your pan on the cooking zone.
Always lift pans off the Induction hob – do not slide, or they may scratch the glass.
EN-7
How to use
Start cooking
Touch the ON/OFF control for three seconds.
After power on, the
buzzer beeps once, all displays show “–” or “– –”, indicating that the
induction hob has entered the state of standby mode.
Place a suitable pan on the cooking zone that you wish to use.
• Make sure the bottom of the pan and the surface of the cooking
zone are clean and dry.
Touching the heating zone slider control ,
and a indicator next to the
key will flash.
Select a heat setting by touching the slider control
• If you don’t choose a heat setting within 1 minute, the Induction
hob will automatically switch off. You will need to start again at step 1.
• You can modify the heat setting at any time during cooking.
If the display flashes alternately with the heat setting
This means that:
• you have not placed a pan on the correct cooking zone or,
• the pan you’re using is not suitable for induction cooking or,
• the pan is too small or not properly centered on the cooking zone.
EN-8
ENGLISH
No heating takes place unless there is a suitable pan on the cooking zone.
The display will automatically disappear after 1 minute if no suitable pan is placed on it.
power up
power down
Finish cooking
Touching the heating zone selection control that you wish to
switch off.
the display shows “0”.
Turn the whole cooktop off by touching the ON/OFF control.
Beware of hot surfaces
H will show which cooking zone is hot to touch. It will
disappear when the surface has cooled down to a safe
temperature. It can also be used as an energy saving function
if you want to heat further pans, use the hotplate that is still
hot.
Using the Boost function
Activate the boost function
Touching the heating zone slider control
Touching the slider to “B”. Make sure the display shows “b”.
Cancel the Boost function
Touching the heating zone slider control that you wish to cancel
the boost function.
the display shows “0”.
Turn the cooking zone off by touching the slider to “ 0 ”. Make sure
Turn the cooking zone off by touching the slider to “0”. Make sure
EN-9
The function can work in any cooking zone.
The cooking zone returns to its original setting after 5 minutes.
If the original heat setting equals 0, it will return to 9 after 5 minutes.
Flexible Area
• This area can be used as a single zone or as two different zones, accordingly to the cooking needs anytime.
• Flexible area is made of two independent inductors that can be controlled separately. When working as a single zone,
the part that is not covered by cookware is automatically switched off after one minute.
• To grant a correct pan detection and a even heat distribution, the cookware should be correctly placed:
- In the front or rear side of the flexible zone when the cookware is smaller than 22 cm
- Anywhere with bigger cookware
As big zone
To activate the flexible area as a single big zone, simply press the Flexible
Area control.
The power setting works as any other normal area.
If the pot is moved from the front to the rear part (or vice versa), the flexible area detects automatically the new position,
keeping the same power.
To add a further pot, press again the dedicated keys, in order to detect the cookware.
As two independent zones
To use the flexible area as two different zones with different power settings, press the Flexible Area control.
• This area can set the power according to the position of the pot.
• If the pot is on the bottom of flexible area, the power is set to Level 1.
• If the pot is on the top of flexible area, the power is set to Level 9.
for 2 second
Move the position of the pot, the power will change automatically
Press the Flexible Area control to turn off the cooking zone.
French Plaque
• If the pot is on the middle of flexible area, the power is set to Level 6.
French Plaque
To activate the French Plaque area, simply press the Flexible Area control
Cancel French Plaque
EN-10
ENGLISH
Locking the Controls
You can lock the controls to prevent unintended use (for example children accidentally turning the cooking zones
on).
When the controls are locked, all the controls except the ON/OFF control are disabled.
When the hob is in the lock mode, all the controls are disable except the ON/OFF
,
you can always turn the induction
hob off with the ON/OFF control in an emergency, but you shall unlock the hob first in the next operation.
Pause Mode
You can pause the heating instead of shutting the hob off.
When entering the Pause mode, all the controls except the ON/OFF control are disabled.
To enter pause mode
Short touch the Timer “ and Timer ”
” at the same
time.
All the indicator will show “ 11“
To exit pause mode
Short touch the Timer “ and Timer ”
” at the same time.
When the hob is in the pause mode, all the controls are disable except the ON/OFF
,
you can always turn the
induction hob off with the ON/OFF control in an emergency. The hob will shut down after 10min if you don’t exit the
pause mode.
Power Management Function
it is possible to set a maximum power absorption level for the induction hob, choosing up to different power
ranges.
induction hobs are able to limit themselves automatically in order to work at lower power level, to avoid the risk of
overloading.
The timer indicator will show “ Lo ”
To lock the controls
To unlock the controls
Touch and hold the lock control for a
while.
Touch and hold the lock control for a while.
EN-11
To enter Power Management Function
The timer indicator will show “ P5“ which means power
To switch to another level
or
There are 5 power levels, from “P1” to “p5”. The timer
indicator will show one of them.
“P1” : the maximum power is 2.5Kw.
“P2” : the maximum power is 3.5Kw.
“P3” : the maximum power is 4.5Kw.
“P4” : the maximum power is 5.5Kw.
Confirmation and Exit Power Management Function
” for confirmation.
Then the hob will be turned off.
Timer control
You can use the timer in two different ways:
You can use it as a minute minder. In this case, the timer will not turn any cooking zone off when the set time is
up.
You can set it to turn one or more cooking zones off after the set time is up.
The timer of maximum is 99min.
Turn on the hob, then Press at the same time the
press +/- of the timer
and Timer
level 5 The default mode is on max power of the hob.
“P5” : the maximum power is max power of the hob.
Press at the same time key lock
key lock and .Timer
EN-12
ENGLISH
a) Using the Timer as a Minute Minder
If you are not selecting any cooking zone
Make sure the cooktop is turned on.
Note: you can use the minute minder even if you’re not selecting any
cooking zone.
Touch “+” the controls of the timer. The minder
indicator will start flashing and 10” will show
in the timer display.
Set the time by touching the “-” or “+” control
of the timer
Hint: Touch the “-” or “+” control of the timer
once to decrease or increase by 1 minute.
Touch and hold the “-” or “+” control of the timer to decrease or
increase by 10 minutes.
When the time is set, it will begin to count down
immediately. The display will show the remaining
time and the timer indicator will flash for 5 seconds.
Buzzer will beep for 30 seconds and the timer
indicator shows “- - “ when the setting time finished.
b) Setting the timer to turn one or more cooking zones off
Set one zone
Touching the heating zone slider control
Set the time by touching the or control of the timer
Hint: Touch the “-“ or “+” control of the timer
once will decrease or increase by 1 minute.
Touch and hold the ”-“ or “+”control of the timer
will decrease or increase by 10 minutes.
When the time is set, it will begin to count down immediately. The display
will show the remaining time and the timer indicator flash for 5 seconds.
NOTE: The red dot next to power level indicator will illuminate
indicating that zone is selected.
EN-13
When cooking timer expires, the corresponding cooking zone will be
switched off automatically.
Other cooking zone will keep operating if they are turned on previously.
set more zones:
The steps for setting more zones are similar to the steps of setting one zone;
When you set the time for several cooking zones simultaneously, decimal dots of the relevant cooking zones are on.
The minute display shows the min. timer. The dot of the corresponding zone flashes.
The shown as below:
(set to 15 minutes)
(set to 45 minutes)
Once the countdown timer expires, the corresponding zone will
switch off. Then it will show the new min. timer and the dot of
corresponding zone will flash.
The shown as right:
(set to 30 minutes)
Touch the heating zone selection control, the corresponding timer will be shown in the timer indicator.
c) Cancel the timer
Touching the heating zone slider control that you want to cancel
the timer
Touch and hold the timer control “ - ”, the timer decreases to “00”
and the timer is cancelled.
Default working times
Auto shut down is a safety protection function for your induction hob. It shut down automatically if ever you forget to
turn off your cooking. The default working times for various power levels are shown in the below table:
Power level
1 2 3 4 5 6 7 8 9
Default working timer (hour)
8 8 8 4 4 4 2 2 2
When the pot is removed, the induction hob can stop heating immediately and the hob automatically switch off after 2
minutes.
People with a heart pace maker should consult with their doctor before using this unit.
EN-14
ENGLISH
To make the pairing between Hob and APP use the following process:
When wi-fi ON: one dot will appear on the right side of the LED
When WIFI OFF: No dot will appear.
Cook with me function
Press 4 seconds the "Cook with me" button on the hob. Once the 4 seconds have passed, the digit of the TIMER starts to blink with
PA written on it and starts the pairing process. Now follow the instructions from the App.
How to set Cook with me
If you want to get out of "Cook with me" function change the power
level of the zone.
First of all, you should download hOn App and install to your portable device. Then enroll your induction hob following the
instructions directly from the App.
Choose from the hOn App recipes menu or special programs menu.
Follow step by step the indications on the App and when you have
finished send the parameters to the hob that will cook for you.
When the hob receives the command from the app, the hob will beep
for 2 times and blink for one second to indicate that the instructions
have been received.
a. WIRELESS PARAMETERS
Technology Wi-Fi BLE NFC
Standard
IEEE 802.11b/n/g
Bluetooth v4.2, BR/EDR, BLE /
Frequency Band(s) [MHz] 2402-2480 2402-2480 /
Maximum Power [mW] 1500 1500 /
press 4 seconds
EN-15
EN-16
ENGLISH
Selection of cooking vessels
You may have a number of different cooking vessels
1. This induction hob can identify a variety of cooking vessels, which you can test by
one of the following methods:
Place the vessel on the cooking zone. If the corresponding cooking zone displays a
power level, then the vessel is suitable. If “U” flashes, then the vessel is not
suitable for use with the induction hob.
2. Hold a magnet to the vessel. If the magnet is attracted to the vessel is suitable for
use with the induction hob.
NB: The base of the vessel must contain magnetic material.
It must have flat bottom with a diameter according to the table 1 below.
3. Use only ferromagnetic cookwares made from enameled steel, cast iron or stainless
steel but compatible with induction
4. Use pans whose diameter of the ferromagnetic area (base of the pan) is in the range
of dimensions in the table below. (Table 1)
- If you use smaller pots, performance could be affected
- If you use pot with a diameter smaller than the one indicated in the table 1, pots
may not be detected
According to the dimension of the zone you can use pots of different diameters as picture
below:
Iron oil frying
Stainless steel
Iron pan
Iron kettle
Enamel
stainless steel
kettle
Enamel cooking
utesil
Iron plate
EN-17
5. If the ferromagnetic part covers only partially the base of the pan, only the
ferromagnetic area will heat up, the rest of the base may not heat up a sufficient
temperature for cooking.
6. If the ferromagnetic area is not homogeneous, but presents others material such as
aluminum this may affect the heating up and the pan detection.
If the base of the pan is similar to the pictures below the pan could be not detected.
The base diameter of induction cookware
Cooking zone
1 & 2 140
140
220
1803 & 4
Minimum Maximum
Flexi zone 220
The above may vary according to the size of the pan and the material it is made from.
220*400
The induction hob is equipped with a self diagnostic function. With this test the technician is able to check the function
of several components without disassembling or dismounting the hob from the working surface.
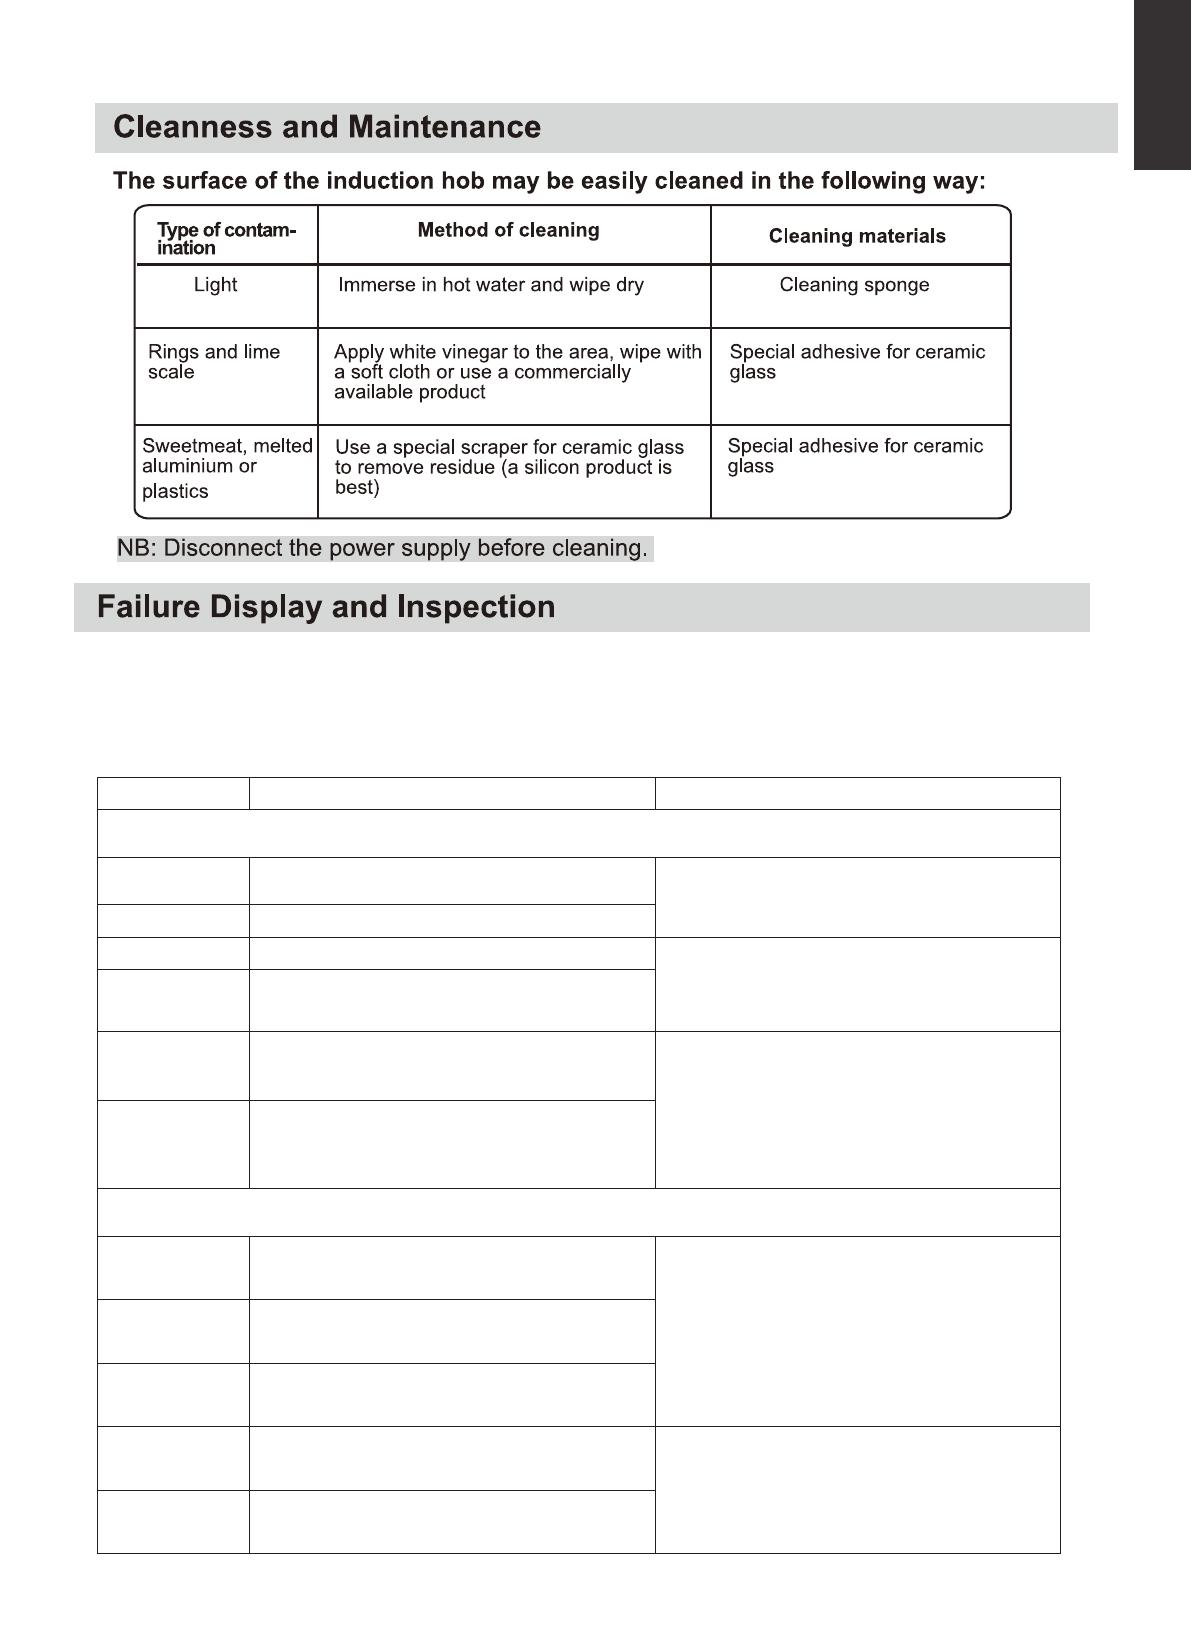
Troubleshooting
1) Failure code occur during customer using & Solution;
Failure code Problem Solution
Auto-Recovery
E1 Supply voltage is above the rated voltage.
Please inspect whether power supply is normal.
Power on after the power supply is normal.
E2 Supply voltage is below the rated voltage.
E3 High temperature of ceramic plate sensor . 1# Wait for the temperature of ceramic plate return
to normal.
Touch “ON/OFF” button to restart unit.
E4 High temperature of ceramic plate sensor . 2#
E5 High temperature of IGBT . 1#
Wait for the temperature of IGBT return to
normal.
Touch “ON/OFF” button to restart unit.
Check whether the fan runs smoothly;
if not , replace the fan.
E6 High temperature of IGBT. 2#
No Auto-Recovery
F3/F6
Ceramic plate temperature sensor failure- -short
circuit. (F3 for 1#,F6 for2#)
Check the connection or replace the ceramic
plate temperature sensor.
F4/F7
Ceramic plate temperature sensor failure--open
circuit. (F4 for 1#,F7 for2#)
F5/F8
Ceramic plate temperature sensor
failure—invalid . (F5 for 1#,F8 for2#)
F9/FA
Temperature sensor of the IGBT failure. short
circuit/open circuit for 1#
Replace the power board.
FC /FD
Temperature sensor of the IGBT failure. short
circuit/open circuit for 2#
EN-18
ENGLISH
The above are the judgment and inspection of common failures.
Please do not disassemble the unit by yourself to avoid any dangers and damages to the induction hob.
2) Specific Failure & Solution
Failure Problem Solution A Solution B
The LED does not
come on when unit is plugged
in.
No power supplied. Check to see if plug is
secured tightly in outlet and
that outlet is working.
The accessorial power
board and the display
board connected failure.
Check the connection.
The accessorial power
board is damaged.
Replace the accessorial
power board.
The display board is
damaged.
Replace the display board.
Some buttons can’t work, or
the LED display is not normal.
The display board is
damaged.
Replace the display board.
The Cooking Mode Indicator
comes on, but heating does
not start.
High temperature of the
hob.
Ambient temperature may be
too high. Air Intake or Air
Vent may be blocked.
There is something wrong
with the fan.
Check whether the fan runs
smoothly
if not , replace the fan.
The power board is
damaged.
Replace the power board.
Heating stops suddenly
during operation and the
display flashes “u”.
Pan Type is wrong. Use the proper pot (refer to
the instruction manual.)
Pan detection circuit
is damaged, replace
the power board.
Pot diameter is too small.
Cooker has overheated
;
Unit is overheated. Wait for
temperature to return to
normal.
Push “ON/OFF” button to
restart unit.
Heating zones of the same
side ( Such as the first and
the second zone ) would
display “u” .
The power board and the
display board connected
failure;
Check the connection.
The display board of
communicate part is
damaged.
Replace the display board.
The Main board is
damaged.
Replace the power board.
Fan motor sounds abnormal. The fan motor is damaged. Replace the fan.
EN-19
  • Page 1 1
  • Page 2 2
  • Page 3 3
  • Page 4 4
  • Page 5 5
  • Page 6 6
  • Page 7 7
  • Page 8 8
  • Page 9 9
  • Page 10 10
  • Page 11 11
  • Page 12 12
  • Page 13 13
  • Page 14 14
  • Page 15 15
  • Page 16 16
  • Page 17 17
  • Page 18 18
  • Page 19 19
  • Page 20 20
  • Page 21 21
  • Page 22 22
  • Page 23 23
  • Page 24 24
  • Page 25 25
  • Page 26 26
  • Page 27 27
  • Page 28 28
  • Page 29 29
  • Page 30 30
  • Page 31 31
  • Page 32 32
  • Page 33 33
  • Page 34 34
  • Page 35 35
  • Page 36 36
  • Page 37 37
  • Page 38 38
  • Page 39 39
  • Page 40 40
  • Page 41 41
  • Page 42 42
  • Page 43 43
  • Page 44 44
  • Page 45 45
  • Page 46 46
  • Page 47 47
  • Page 48 48
  • Page 49 49
  • Page 50 50
  • Page 51 51
  • Page 52 52
  • Page 53 53
  • Page 54 54
  • Page 55 55
  • Page 56 56
  • Page 57 57
  • Page 58 58
  • Page 59 59
  • Page 60 60
  • Page 61 61
  • Page 62 62
  • Page 63 63
  • Page 64 64
  • Page 65 65
  • Page 66 66
  • Page 67 67
  • Page 68 68
  • Page 69 69
  • Page 70 70
  • Page 71 71
  • Page 72 72
  • Page 73 73
  • Page 74 74
  • Page 75 75
  • Page 76 76
  • Page 77 77
  • Page 78 78
  • Page 79 79
  • Page 80 80
  • Page 81 81
  • Page 82 82
  • Page 83 83
  • Page 84 84
  • Page 85 85
  • Page 86 86
  • Page 87 87
  • Page 88 88
  • Page 89 89
  • Page 90 90
  • Page 91 91
  • Page 92 92
  • Page 93 93
  • Page 94 94
  • Page 95 95
  • Page 96 96
  • Page 97 97
  • Page 98 98
  • Page 99 99
  • Page 100 100
  • Page 101 101
  • Page 102 102
  • Page 103 103
  • Page 104 104
  • Page 105 105
  • Page 106 106
  • Page 107 107
  • Page 108 108
  • Page 109 109
  • Page 110 110
  • Page 111 111
  • Page 112 112
  • Page 113 113
  • Page 114 114
  • Page 115 115
  • Page 116 116
  • Page 117 117
  • Page 118 118
  • Page 119 119
  • Page 120 120
  • Page 121 121
  • Page 122 122
  • Page 123 123
  • Page 124 124
  • Page 125 125
  • Page 126 126
  • Page 127 127
  • Page 128 128
  • Page 129 129
  • Page 130 130
  • Page 131 131
  • Page 132 132
  • Page 133 133
  • Page 134 134
  • Page 135 135
  • Page 136 136
  • Page 137 137
  • Page 138 138
  • Page 139 139
  • Page 140 140
  • Page 141 141
  • Page 142 142
  • Page 143 143
  • Page 144 144
  • Page 145 145
  • Page 146 146
  • Page 147 147
  • Page 148 148
  • Page 149 149
  • Page 150 150
  • Page 151 151
  • Page 152 152
  • Page 153 153
  • Page 154 154
  • Page 155 155
  • Page 156 156
  • Page 157 157
  • Page 158 158
  • Page 159 159
  • Page 160 160
  • Page 161 161
  • Page 162 162
  • Page 163 163
  • Page 164 164
  • Page 165 165
  • Page 166 166
  • Page 167 167
  • Page 168 168
  • Page 169 169
  • Page 170 170
  • Page 171 171
  • Page 172 172
  • Page 173 173
  • Page 174 174
  • Page 175 175
  • Page 176 176
  • Page 177 177
  • Page 178 178
  • Page 179 179
  • Page 180 180
  • Page 181 181
  • Page 182 182
  • Page 183 183
  • Page 184 184
  • Page 185 185
  • Page 186 186
  • Page 187 187
  • Page 188 188
  • Page 189 189
  • Page 190 190
  • Page 191 191
  • Page 192 192
  • Page 193 193
  • Page 194 194
  • Page 195 195
  • Page 196 196
  • Page 197 197

Haier HAFRSJ64MC Uživatelský manuál

Typ
Uživatelský manuál
Tato příručka je také vhodná pro